6.5. Configuring Route Policies with CLI
This section provides information to configure route policies using the command line interface.
Topics in this section include:
6.6. Route Policy Configuration Overview
Route policies allow you to configure routing according to specifically defined policies. You can create policies and entries to allow or deny paths based on parameters such as source address, destination address, protocol, and community list.
Policies can be as simple or complex as required. A simple policy can block routes for a specific location or IP address. More complex policies can be configured using numerous policy statement entries containing matching conditions to specify whether to accept or reject the route, control how a series of policies are evaluated, and manipulate the characteristics associated with a route.
6.6.1. When to Create Routing Policies
Route policies are created in the config>router context. There are no default route policies. Each route policy must be explicitly created and applied. Applying route policies can introduce more efficiency as well as more complexity to the capabilities of the 7705 SAR.
Route policies are used to control which MPLS labels should be learned or advertised. Based on the configured routing policy, MPLS labels from certain neighbors can be discarded.
Route policies are also used to control the size and content of the BGP, OSPF, and IS-IS routing tables, the routes that are advertised, and the best route to take to reach a destination.
Route policies can be created to control:
- a protocol to export all the active routes learned by that protocol
- route characteristics to control which route is selected to act as the active route to reach a destination and advertise the route to neighbors
- the protocol to import all routes into the routing table. A routing table must learn about particular routes to be able to forward packets and redistribute to other routing protocols.
- damping
Before a route policy is applied, analyze the policy’s purpose and be aware of the results (and consequences) when packets match the specified criteria and the associated actions and default actions, if specified, are executed. Membership reports can be filtered based on a specific source address.
6.6.2. Default Route Policy Actions
Routing protocols have default behaviors for the import and export of routing information.
For BGP, OSPF, and IS-IS, the default route policy actions are as follows:
- BGP
- import – all routes from BGP peers are accepted and passed to the BGP route selection process
- export (internal routes) – all active BGP routes are advertised to BGP peers
- export (external routes) – all non-BGP learned routes are not advertised to BGP peers
- OSPF and IS-IS
- import – not applicable; all OSPF or IS-IS routes are accepted from OSPF or IS-IS neighbors and cannot be controlled by route policies
- export (internal routes) – all OSPF or IS-IS routes are automatically advertised to all neighbors
- export (external routes) – all non-OSPF or non-IS-IS learned routes are not advertised to OSPF or IS-IS neighbors
6.6.3. Policy Evaluation
Routing policy statements can consist of one or several entries. The entries specify the matching criteria. A label is compared to the first entry in the policy statement. If it matches, the specified entry action is taken, either accepted or rejected. If the action is to accept or reject the label, that action is taken and the evaluation of the label ends.
If the label does not match the first entry, the label is compared to the next entry (if more than one is configured) in the policy statement. If there is a match with the second entry, the specified action is taken. If the action is to accept or reject the label, that action is taken and the evaluation of the label ends, and so on.
Each route policy statement can have a default-action clause defined. If a default action is defined for one or more of the configured route policies, the default action should be handled in the following ways.
- The process stops when the first complete match is found and executes the action defined in the entry.
- If the packet does not match any of the entries, the system executes the default action specified in the policy statement.
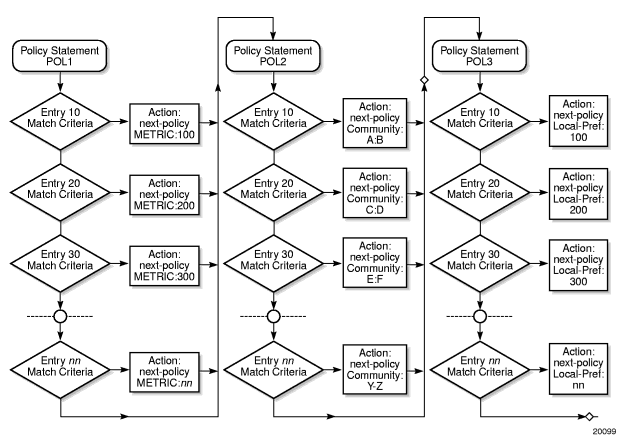
Route policies can also match a given route policy entry and continue to search for other entries within either the same route policy or the next route policy by specifying the next-entry or next-policy option in the entry’s action command. Policies can be constructed to support multiple states to the evaluation and setting of various route attributes.
Figure 18 shows an example of the route policy process.
Figure 19 shows the next-entry and next-policy route policy processes. The next-entry logic is that for each policy statement, the process checks each entry until the first match is hit, at which point the appropriate action is taken, which could be next-policy.
Figure 18: Route Policy Process Example
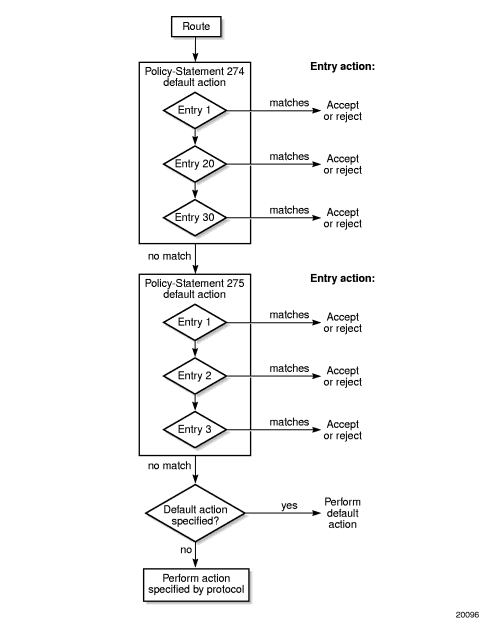
Figure 19: Next Entry and Next Policy Logic Example
6.6.3.1. Damping
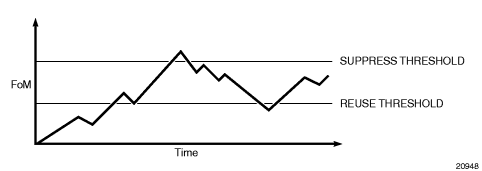
Damping initiates controls when routes flap. Route flapping can occur when an advertised route between nodes alternates (flaps) back and forth between two paths due to network problems that cause intermittent route failures. To limit processing requirements, the amount of routing state change updates propagated must be reduced. Thus, when a route flaps beyond a configured value (the suppress value), then that route is removed from the routing table and routing protocols until the value falls below the reuse value.
A route can be suppressed according to the Figure of Merit (FoM) value. The FoM is a value that is added to a route each time it flaps. A new route begins with an FoM value of 0.
Damping is optional. If damping is configured, the following parameter values must be explicitly specified because there are no default values:
- suppress
- half-life
- reuse
- max-suppress
When a route’s FoM value exceeds the suppress value, the route is removed from the routing table. The route is considered to be stable when the FoM drops below the reuse value by means of the specified half-life parameter. The route is then returned to the routing tables. When routes have higher FoM and half-life values, they are suppressed for longer periods of time. Figure 20 depicts an example of a flapping route, the suppress threshold, the half-life decay (time), and reuse threshold. The peaks represent route flaps, and the slopes represent half-life decay.
Figure 20: Damping Example
6.7. Basic Route Policy Configuration
This section provides information on configuring route policies and shows configuration examples of common tasks.
The minimum route policy parameters that need to be configured are:
- policy statement with the following parameters specified:
- at least one entry
- entry action
The following is an example of route policy configuration, including examples for defining community members, community expressions, and the as-path regular expressions.
6.8. Configuring Route Policy Components
Use the CLI syntax displayed below to configure the following:
6.8.1. Beginning the Policy Statement
Use the following CLI syntax to begin a policy statement configuration. In order for a policy statement to be complete, an entry must be specified (see Configuring an Entry).
The following error message displays if you try to enter a policy options command without entering begin first.
The following example displays policy statement configuration command usage. These commands are configured in the config>router context.
There are no default policy statement options. All parameters must be explicitly configured.
6.8.2. Creating a Route Policy
To enter the mode to create or edit route policies, you must enter the begin keyword at the config>router>policy-options prompt. Other editing commands include:
- the commit command, which saves changes made to route policies during a session
- the abort command, which discards changes that have been made to route policies during a session
Use the following CLI syntax to enter the edit mode:
The following example displays some commands to configure a policy statement. Policy option commands are configured in the config>router context. Use the commit command to save the changes.
The following error message displays if you try to modify a policy option without entering begin first.
6.8.3. Configuring a Default Action
Specifying a default action is optional. The default action controls those packets not matching any policy statement entries. The default action is applied only to those routes that do not match any policy entries.
If no default action is specified and there is no match, the packets will be accepted.
A policy statement must include at least one entry (see Configuring an Entry).
To enter the mode to create or edit route policies, you must enter the begin keyword at the config>router>policy-options prompt. Other editing commands include:
- the commit command, which saves changes made to route policies during a session
- the abort command, which discards changes made to route policies during a session
The following example displays default action configuration command usage. These commands are configured in the config>router>policy-options context.
The following example displays the default action configuration:
6.8.4. Configuring an Entry
An entry action must be specified. The other parameters in the entry>action context are optional.
The from>community and from>community expression commands are mutually exclusive for a specific entry. The last community command entered overwrites any previous community command.
The following example displays entry command usage. These commands are configured in the config>router>policy-options context.
The following example displays entry parameters and includes the default action parameters that were displayed in the previous section.
6.8.5. Configuring an AS Path (policy-option)
An AS path is defined by a regular expression in the config>router>policy-options context. Once defined, it can be added, removed, or replaced in a policy statement as part of a default action, an entry action, or an entry from (source) definition. See Configuring a Default Action and Configuring an Entry.
The following example displays as-path command usage.
6.8.6. Configuring a Community List or Expression
Community lists are composed of a group of destinations that share a common property. Community lists allow you to administer actions on a configured group instead of having to execute identical commands for each member.
Community expressions are logical expressions composed of community lists (community IDs) separated by AND, OR, and NOT operations. Community expressions provide flexible matching of communities.
Community lists and expressions must be enclosed within quotes.
The following example displays community list and community expression configurations:
6.8.7. Configuring Damping
Observe the following when configuring damping.
- For each damping profile, all parameters must be configured.
- The suppress value must be greater than the reuse value (see Figure 20).
- Damping is enabled in the config>router>bgp context at the BGP global, group, and neighbor levels. If damping is enabled but route policy does not specify a damping profile, the default damping profile is used. This default profile is always present and consists of the following parameters:
- half-life: 15 min
- max-suppress: 60 min
- reuse: 750
- suppress: 3000
Use the following CLI syntax to configure damping:
The following example displays damping configuration command usage.
The following example displays a damping configuration:
6.8.8. Configuring a Prefix List
Use the following CLI syntax to configure a prefix list:
The following example displays prefix list configuration command usage. These commands are configured in the config>router context.
The following example displays the prefix list configuration.
6.8.9. Configuring PIM Join Policies
Join policies are used in Protocol Independent Multicast (PIM) configurations to prevent the transport of multicast traffic across a network and the dropping of packets at a router at the edge of the network. PIM Join filters reduce the potential for denial of service (DoS) attacks and PIM state explosion—large numbers of Join messages forwarded to each router on the RPT, resulting in memory consumption. For information on importing a Join policy into a PIM configuration, see the “Importing PIM Join Policies” section in the 7705 SAR Routing Protocols Guide.
Configuring a PIM join policy follows the same process as that for any other policy. However, when configuring an entry, include the entry>from>group-address and entry>from>source-address commands. See Configuring an Entry for the CLI syntax.
The following example displays the command usage for a PIM join policy named “pim_join”. The policy will not allow Join messages for group 229.50.50.208/32 and source 192.168.0.0/16, but will allow other Join messages. These commands are configured in the config>router context.
The following example displays the PIM join policy configuration:
6.8.10. Configuring Bootstrap Message Import and Export Policies
Bootstrap import and export policies are used to control the flow of bootstrap messages to and from the rendezvous point (RP).
The following configuration example specifies that there should be no BSR messages received or sent out of interface port 1/1/1. These commands are configured in the config>router context.
The following configuration example illustrates the application of the policies to PIM. Up to five import and five export policies can be specified.
6.9. Route Policy Configuration Management Tasks
This section describes the following route policy configuration management tasks:
6.9.1. Editing Policy Statements and Parameters
Route policy statements can be edited to modify, add, or delete parameters. To enter edit mode, you must enter the begin keyword at the config>router>policy-options prompt. Other editing commands include:
- the commit command, which saves changes made to route policies during a session
- the abort command, which discards changes that have been made to route policies during a session
The following example displays some commands to configure a policy statement. These commands are configured in the config>router>policy-options context.
The following example displays the changed configuration.
6.9.2. Deleting an Entry
Use the following CLI syntax to delete a policy statement entry:
The following example displays the commands required to delete a policy statement entry.
6.9.3. Deleting a Policy Statement
Use the following CLI syntax to delete a policy statement:
The following example displays the commands required to delete a policy statement.