Configuring Physical Ports with CLI
This section provides information to configure cards, MDAs, and ports. Topics in this section include:
Preprovisioning Guidelines
SR OSs have a console port, either located on the CPM or CCM, or integrated into the chassis (on the 7750 SR-c4 models), to connect terminals to the router.
Configure parameters from a system console connected to a router console port, using Telnet to access a router remotely or SSH to open a secure shell connection.
Predefining Entities
In order to initialize a card, the chassis slot, line card type, and MDA type must match the preprovisioned parameters. In this context, preprovisioning means to configure the entity type (such as the card type, MDA type, port, and interface) that is planned for a chassis slot, card, or MDA. Preprovisioned entities can be installed but not enabled or the slots can be configured but remain empty until populated. Provisioning means that the preprovisioned entity is installed and enabled.
You can:
- Pre-provision ports and interfaces after the line card and MDA types are specified.
- Install line cards in slots with no preconfiguration parameters specified. Once the card is installed, the card and MDA types must be specified.
- Install a line card in a slot provisioned for a different card type (the card will not initialize). The existing card and MDA configuration must be deleted and replaced with the current information.
Preprovisioning a Port
Before a port can be configured, the slot must be preprovisoned with an allowed card type and the MDA must be preprovisioned with an allowed MDA type. Some recommendations to configure a port include:
- Ethernet
- Configure an access port for customer facing traffic on which services are configured.An encapsulation type may be specified in order to distinguish services on the port or channel. Encapsulation types are not required for network ports.To configure an Ethernet access port, see the Ethernet Access Port section.
- SONET/SDH
- SONET/SDH can be used only when configuring an OC-3, OC-12, OC-48, OC-192, and OC-768 SONET paths on an appropriate MDA.To configure a SONET path, see the Configuring SONET/SDH Port Parameters sectionConfigure a network port or channel to participate in the service provider transport or infrastructure network.Accounting policies can only be associated with network ports/channels and Service Access Ports (SAPs). Accounting policies are configured in the config>log> accounting-policy context.To configure an Ethernet network port, see the Ethernet Network Port section.
- Channelized
- Channelized ports can only be configured on channel-capable MDAs or CMAs such as the channelized DS-3, channelized OC-3-SFP, channelized OC-12-SFP, or channelized Any Service Any Port MDAs or CMAs.
Maximizing Bandwidth Use
Once ports are preprovisioned, Link Aggregation Groups (LAGs), multilink-bundles (IMA), or Bundle Protection Groups (for example IMA BPGrps), can be configured to increase the bandwidth available between two nodes.
All physical links or channels in a given LAG/bundle combine to form one logical connection. A LAG/bundle also provides redundancy in case one or more links that participate in the LAG/bundle fail. For command syntax for multilink bundles, see Configuring Multilink PPP Bundles. To configure channelized port for TDM, refer to section Configuring Channelized Ports. To configure channelized port for Sonet/SDH high speed channels (ASAP MDAs only), refer to Configuring SONET/SDH Port Parameters. For command syntax for LAG, see the Configuring LAG Parameters section.
Basic Configuration
The most basic configuration must have the following:
- Identify chassis slot
- Specify line card type (must be an allowed card type)
- Specify MCM slot for the 7750 SR-c4 and SR-c12 only (not required for CMA)
- Specify MCM type the 7750 SR-c4 and SR-c12 only (must be an allowed MCM type)
- Identify MDA slot
- Specify MDA (must be an allowed MDA type)
- Identify specific port to configure
The following is an example of card configuration for the 7750 SR:
The following is an example of card configuration on a 7750 SR-c12:
The following is an example of card configurations for the 7950 XRS:
Common Configuration Tasks
The following sections are basic system tasks that must be performed.
Configuring Cards and MDAs
Card configurations include a chassis slot designation. A slot must be preconfigured with the type of cards and MDAs which are allowed to be provisioned.
To configure the Versatile Service Module, refer to the Versatile Service Module section of the 7750 SR 7450 ESS, 7750 SR, and 7950 XRS Services Overview Guide.
The following example shows card and MDA configurations for the 7750 SR or 7450 ESS:
The following example shows card configurations for the 7950 XRS:
Configuring Cards, MCMs and MDAs
Card configurations must include a chassis slot designation. A slot must be preconfigured with the type of cards, MCMs, and MDAs which are allowed to be provisioned.
Output for Media Dependent Adapters (MDAs) show an “m” in the mda-type description, for example, m60-eth10/100-tx.
Use the config > info command to display card configuration information:
Configuring Cards and CMAs
Card configurations must include a chassis slot designation. A slot must be preconfigured with the type of cards and CMAs (Compact Media Adapters) which are allowed to be provisioned.
CMAs are configured using the MDA command. Output for Compact Media Adapter MDAs show a “c” in the mda-type description, for example, c8-10/100eth-tx.
Use the config > info command to display card configuration information:
Configuring Forwarding Plane Parameters
The fp command is not allowed on iom-1 or iom-2 types. An error message appears when the command is executed on an incorrect IOM type:
The following example shows a forwarding plane configuration for the 7750 SR or 7450 ESS:
Configuring MDA Access and Network Pool Parameters
MDA-level pools are used by ingress network queues. Network policies can be applied (optional) to create and edit QoS pool resources on egress network ports, channels, and ingress MDAs. Network-queue and slope policies are configured in the config>qos context.
The following example shows an MDA pool configuration for 7750 SR or 7450 ESS:
The following example shows an XMA pool configuration for 7950 XRS:
Configuring MDA Policies for Named Pools Mode
Network ingress queues can use either MDA ingress named pools or ingress default pools but not port named pools. In the case with an IOM with multiple MDAs sharing the same buffer space (iom3-xp, iom-10g), network ingress queues will use only the MDA 1 named pools. Even if named pools are configured for MDA 2, they will not be used by network ingress queues. Network ingress queues configured to use MDA2 named pools will be considered pool orphaned. To check for orphan queues, use the command “show mda <mda> qos ingress orphaned-queues”.
SAP shared queues use by default the SAP shared pool; a system reserved buffer pool. Shared queues can be configured to use MDA named pools. Shared queues cannot be configured to use port pools since they are not port specific queues. In case a shared queue is configured to use a port named pool, the queue will be considered orphan and will get buffers from access ingress default pool.
For complete QoS configuration details reference the Named Pools section of the Quality of Service Guide. Interface Named Pools configuration details are located in the Interface CLI portion of this guide.
Configuring Ports
This section provides the CLI syntax and examples to configure the following:
Configuring Port Pool Parameters
The buffer space is portioned out on a per port basis whether one or multiple MDAs share the same buffer space. Each port gets an amount of buffering which is its fair-share based on the port’s bandwidth compared to the overall active bandwidth.
IOM with each MDA has a dedicated buffer space: iom-20g; iom2-20g.
IOM with multiple MDAs share a buffer space: iom-10g; iom3-xp.
This mechanism takes the buffer space available and divides it into a portion for each port based on the ports active bandwidth relative to the amount of active bandwidth for all ports associated with the buffer space. The number of ports sharing the same buffer space depends on the type of IOM the pools are being created on and the type of MDAs populated on the IOM. An active port is considered to be any port that has an active queue associated. Once a queue is created for the port, the system will allocate the appropriate amount of buffer space to the port. This process is independently performed for both ingress and egress.
Normally, the amount of active bandwidth is considered as opposed to total potential bandwidth for the port when determining the ports fair share. If a port is channelized and not all bandwidth is allocated, only the bandwidth represented by the configured channels with queues configured is counted towards the bandwidth represented by the port. Also, if a port may operate at variable speeds (as in some Ethernet ports), only the current speed is considered. Based on the above, the number of buffers managed by a port may change due to queue creation and deletion, channel creation and deletion and port speed variance on the local port or other ports sharing the same buffer space.
After the active bandwidth is calculated for the port, the result may be modified through the use of the ‘ing-percentage-of-rate’ and ‘egr-percent-of-rate’ commands. The default value of each is 100% which allows the system to use all of the ports active bandwidth when deciding the relative amount of buffer space to allocate to the port. When the value is explicitly modified, the active bandwidth on the port is changed according to the specified percentage. If a value of 50% is given, the ports active bandwidth will be multiplied by 5, if a value of 150% is given, the active bandwidth will be multiplied by 1.5. This capability is independent of named pool mode. The ports rate percentage parameters may be modified at any time.
Examples:
- To modify (in this example, to double) the size of buffer allocated on ingress for a port:B:SR7-10# configure port 1/2/1 modify-buffer-allocation-rate ing-percentage-of-rate 200
- To modify (in this example, to double) the size of buffer allocated on ingress for a port:B:SR7-10# configure port 1/2/1 modify-buffer-allocation-rate egr-percentage-of-rate 200
The Named Buffer Pools feature provides a way to customize the port ingress and/or egress buffer allocation. The port buffer allocation size and the Forwarding class (FC) queue association to the buffer pool can be changed. By mapping each FC to different pools, it is possible to achieve separation of the available buffers per forwarding class.
Previous to this feature only the default buffer allocation mode was available, withBuffer allocation has the following characteristics:
- Each port manages a buffer according to its active bandwidth (ports with equal active bandwidth get the same buffer size).
- An access port has 2 default pools created: access-ingress and access-egress.
- A network port has 2 default pools created: ingress-MDA (common pool for all ingress network ports) and network-egress.
- All queues defined for a port receive buffers from the same buffer pool.
The Named Buffer Pools feature offers the following new capabilities:
- Ability to modify the port bandwidth considered for buffer allocation without changing the active port bandwidth. (modify-buffer-allocation-rate) (ports with equal active bandwidth can be configured to get different buffer size)
- Configuration of a named pool policy that includes the customized buffer pools
- Forwarding class queues are associated with the named pools
- Pools can be default, MDA common pools, or port specific pools
The following example shows port pool configurations:
The following shows a CBS configuration over subscription example:
Changing Hybrid-Buffer-Allocation
The following example shows a hybrid-buffer-allocation value change (from default) for ingress. In this example, the network-egress buffer pool is two times the size of the access-egress.
Configuring APS Parameters
| Note: Nokia recommends grouping working lines and protect lines on separate IOMs. |
APS configuration rules:
- A working port must be added first. Then a protection port can be added or removed at any time.
- A protection port must be shutdown before being removed from an APS group.
- A path cannot be configured on a port before the port is added to an APS group.
- A working port cannot be removed from an APS group until the APS port path is removed.
- When ports are added to an APS group, all path-level configurations are available only on the APS port level and configuration on the physical member ports are blocked.
- For a multi-chassis APS group, only one member circuit (either working or protect) can be added. Note that the neighbor IP address of an APS group must be configured before adding a member circuit in it. The configuration of a non-zero neighbor IP address indicates the APS group as multi-chassis. Thus, the member circuit and services must be removed before adding or removing the neighbor IP address (for example, before converting an APS group from multi-chassis to single-chassis or single-chassis to multi-chassis).
- Bundle Protection Group (BPGrp) — A BPGrp is a collection of two bundles created on the APS Group port. Working bundle resides on the working circuit of the APS group, while protection bundle resides on the protection circuit of the APS group. APS protocol running on the circuits of the APS Group port monitors the health of the Sonet/SDH line and based on it or administrative action moves user traffic from one bundle to another in the group as part of an APS switch.
The following shows a sample configuration for an ATM SC-APS group that contains an aPipe SAP:
The following shows an example of the configuration for the working circuit/node of an MC-APS group:
The following shows an example of the configuration for the protect circuit/node of an MC-APS group:
Configuring Ethernet Port Parameters
Ethernet Network Port
A network port is network facing and participates in the service provider transport or infrastructure network processes.
The following example shows a network port configuration:
Ethernet Access Port
Services are configured on access ports used for customer-facing traffic. If a Service Access Port (SAP) is to be configured on a port, it must be configured as access mode. When a port is configured for access mode, the appropriate encapsulation type can be specified to distinguish the services on the port. Once a port has been configured for access mode, multiple services may be configured on the port.
The following example shows an Ethernet access port configuration:
Configuring 802.1x Authentication Port Parameters
The following example shows an 802.1x port configuration:
Configuring SONET/SDH Port Parameters
SONET/SDH features can only be configured on ports on the following MDAs and CMAs:
- OC-3
- OC-3 ASAP
- OC-12/3
- OC-48
- OC-192
- OC-768
- OC-12 ASAP
- Channelized OC3
- Channelized OC12
- ATM OC-12/3
- ATM OC-12
- Channelized ASAP OC3
- Channelized ASAP OC12
When an Ethernet port is configured in WAN mode (xgig wan), you can change certain SONET/SDH parameters to reflect the SONET/SDH requirements for this port.
The following CLI output shows an example of a SONET/SDH configuration for a WAN PHY Ethernet port.
SONET/SDH Network Port
The following example shows a SONET/SDH network mode configuration:
SONET/SDH Access Port
The following example shows a SONET/SDH access port configuration for the 7750 SR:
Configuring Channelized Ports
When configuring channelized ports, the port ID is specified in different ways depending on the MDA type and level of channelization. Ethernet ports cannot be channelized. Table 30 lists the channelization options and port syntax available on the 7750 SR channelized MDAs.
Table 30: Channelization Options Available on the 7750 SR Channelized MDAs
Framing | Channelization/Mapping Option | Channelized MDAs Supporting Services on the Port/Channel |
599,040 kbits/s (clear channel OC12/STM-4) | ||
SDH | STM4>AUG4>VC4-C4 | None |
SONET | OC12>STS12>STS12c SPE | None |
139,264 kbits/s ñ 149,760 Kbits/s (clear channel STS-3/STM-1 or STS-3/STM-1 channel within STS12-STM4 | ||
SDH | STM4>AUG4>AUG1>VC4 | m4-choc3-as |
SONET | OC12>STS12>STS3c SPE | m4-choc3-as |
44,763 kbits/s (DS3 or sub-DS3 port or a channel) | ||
SDH | STM4>AUG4>AUG1>VC4>TUG3>VC3 | m1-choc12m4-choc3m12-chds3m4-choc3-as |
SDH | STM4>AUG4>AUG1>VC3 | m1-choc12m4-choc3m12-chds3m4-choc3-as |
SONET | OC12>STS12>STS1 SPE | m1-choc12m4-choc3m12-chds3m4-choc3-as |
SDH | STM4>AUG4>AUG1>VC4>TUG3>VC3 | m1-choc12m4-choc3m12-chds3m4-choc3-as |
SDH | STM4>AUG4>AUG1>VC3 | m1-choc12m4-choc3m12-chds3m4-choc3-as |
SONET | OC12>STS12>STS1 SPE | m1-choc12m4-choc3m12-chds3m4-choc3-as |
Up to 2,048 kbits/s (n*DS0 within E1 up to E1) | ||
SDH | STM4>AUG4>AUG1>VC4>TUG3>TUG2>VC12 | m1-choc12m4-choc3m12-chds3m4-choc3-as |
SDH | STM4>AUG4>AUG1>VC3>TUG2>VC12 | m1-choc12m4-choc3m12-chds3m4-choc3-as |
SDH | STM4>AUG4>AUG1>VC4>TUG3>VC3>DS3 | m1-choc12m4-choc3m12-chds3m4-choc3-as |
SDH | STM4>AUG4>AUG1>VC3>DS3 | m1-choc12m4-choc3m12-chds3m4-choc3-as |
SONET | OC12>STS12>STS1 SPE>VT GROUP>VT2 SPE | m1-choc12m4-choc3m12-chds3m4-choc3-as |
SONET | OC12>STS12>STS1 SPE>DS3 | m1-choc12m4-choc3m12-chds3m4-choc3-as |
Up to 1,544 kbits/s (n*DS0 within DS1 up to DS1) | ||
SDH | STM4>AUG4>AUG1>VC4>TUG3>TUG2>TU11>VC11 | m1-choc12m4-choc3m12-chds3m4-choc3-as |
SDH | STM4>AUG4>AUG1>VC4>TUG3>TUG2>TU12>VC11 | None |
SDH | STM4>AUG4>AUG1>VC3>TUG2>VC11 | m1-choc12m4-choc3m12-chds3m4-choc3-as |
SDH | STM4>AUG4>AUG1>VC4>TUG3>TUG2>VC12 | m1-choc12m4-choc3m12-chds3 |
SDH | STM4>AUG4>AUG1>VC3>TUG2>VC12 | m1-choc12m4-choc3m12-chds3m4-choc3-as |
SDH | STM4>AUG4>AUG1>VC4>TUG3>VC3>DS3 | m1-choc12m4-choc3m12-chds3m4-choc3-as |
SDH | STM4>AUG4>AUG1>VC3>DS3 | m1-choc12m4-choc3m12-chds3m4-choc3-as |
SONET | OC12>STS12>STS1 SPE>VT GROUP>VT1.5 SPE | m1-choc12m4-choc3m12-chds3m4-choc3-as |
SONET | OC12>STS12>STS1 SPE>VT GROUP>VT2 SPE | m1-choc12m4-choc3m12-chds3 |
SONET | OC12>STS12>STS1 SPE>DS3 | m1-choc12m4-choc3m12-chds3m4-choc3-as |
| Note: The E1 encapsulation in the ASAP MDA and in the channelized MDAs is compliant to G.704 and G.703. The G.703 feature allows a user to configure an unstructured E1 channel on deep channel MDAs and ASAP MDAs. In G.704, time slot 0 is used to carry timing information by a service provider and thus, only 31 slots are available to the end user. In G.703, all 32 time slots are available to the end user. Timing is provided by the end user. |
A port ID for channels has one of the following syntax as applicable to channelization and mapping options where the port configuration syntax is slot/mda/port (Table 31):
Table 31: Channelized Port Syntax Examples
Port ID for Physical Port Speed | |||
Channel speed | OC12/STM4 | OC3/STM1 | DS3/E3 |
SONET/SDH | |||
STS12/STM4 | port.sts12 | N/A | N/A |
STS3/STM1 | port.sts3-{1..4} | port.sts3 | N/A |
STS1/STM0 | port.sts1-{1..4}.{1..3} | port.sts1-{1..3} | N/A |
TUG3 | port.tug3-{1..4}.{1..3} | port.tug3-{1..3} | N/A |
TU3 | port.tu3-{1..4}.{1..3} | port.tu3-{1..3} | N/A |
VT15/VC1.1 | port.vt15-{1..4}.{1..3}.{1..4}.{1..7} | port.vt15-{1..3}.{1..4}.{1..7} | N/A |
VT2/VC12 | port.vt2-{1..4}.{1..3}.{1..3}.{1..7} | port.vt2-{1..3}.{1..3}.{1..7} | N/A |
TDM | |||
DS3/E3 | port.{1..4}.{1..3} | port.{1..3} | port |
DS1 in DS3 | port.{1..4}.{1..3}.{1..28} | port.{1..3}.{1..28} | port.{1..28} |
DS1 in VT2 | port.{1..4}.{1..3}.{1..3}.{1..7} | port.{1..3}.{1..3}.{1..7} | N/A |
DS1 in VT15 | port.{1..4}.{1..3}.{1..4}.{1..7} | port.{1..3}.{1..4}.{1..7} | N/A |
E1 in DS3 | port.{1..4}.{1..3}.{1..21} | port.{1..3}.{1..21} | port.{1..21} |
E1 in VT2 | port.{1..4}.{1..3}.{1..3}.{1..7} | port.{1..3}.{1..3}.{1..7} | N/A |
N*DS0 in DS1 in DS3 | port.{1..4}.{1..3}.{1..28}.{1..24} | port.{1..3}.{1..28}.{1..24} | port.{1..28}.{1..24} |
N*DS0 in DS1 in VT2 | port.{1..4}.{1..3}.{1..3}.{1..7}.{1..24} | port.{1..3}.{1..3}.{1..7}.{1..24} | N/A |
N*DS0 in DS1 in VT15 | port.{1..4}.{1..3}.{1..4}.{1..7}.{1..24} | port.{1..3}.{1..4}.{1..7}.{1..24} | N/A |
N*DS0 in E1in DS3 | port.{1..4}.{1..3}.{1..21}.{2..32} | port.{1..3}.{1..21}.{2..32} | port.{1..21}.{2..32} |
N*DS0 in E1in VT2 | port.{1..4}.{1..3}.{1..3}.{1..7}.{2..32} | port.{1..3}.{1..3}.{1..7}.{2..32} | N/A |
Verify the MDA Type
To make sure that you have a channel-capable MDA, verify that the MDA-type you are configuring by entering a show mda slot-id command.
The MDAs shown in the MDA Provisioned column in the following output are a 12-port channelized DS3 MDA (m12-ds3) on card 1, MDA slot 1, and a 1-port channelized OC12-SFP MDA (m1-choc12-sfp) on card 1, MDA slot 2.
Configuring a Channelized DS3 Port
Figure 40 shows the logic of the DS3 port configuration.
Figure 40: Channelized DS3 Port Structure
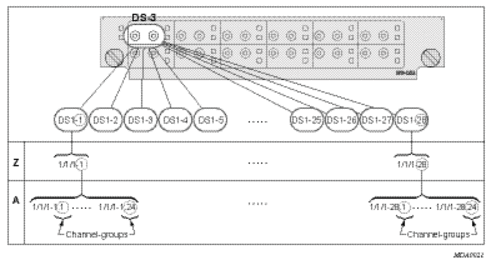
The following shows the steps to configure a channelized port on a 12-port DS3 MDA:
In order to set the channelized mode on a port, the DS3 parameter must be in a shut down state. Clear channel uses out-of-band signaling, not in-band signaling, so the channel's entire bit rate is available. Channelized ports use in-band signaling and must be explicitly enabled as shown:
In the DS1 context, configure DS0 channel groups parameters. 24 timeslots can be configured per channel group as shown:
The following output shows the channelized mode configuration:
Services can be applied to the configured channelized ports. The following example shows the CLI usage to configure a customer IES service with interface SAPs on the channelized ports. Refer to the 7450 ESS, 7750 SR, and 7950 XRS Services Overview Guide for information about how to configure services.
The following output shows the channelized ports (7/1/1.1.1 and 7/1/1.1.2) applied to SAPs on the IES service configuration:
Configuring a Channelized OC-12-SFP Port
Figure 41 shows the logic of the channelized OC-12 port configuration.
Figure 41: Channelized OC-12 Port Structure
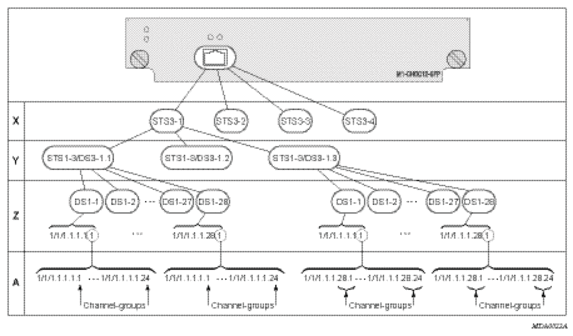
The following shows an example to configure a channelized port on a 1-port channelized OC-12-SFP MDA:
At this level you must choose the tributary. When provisioning DS3 nodes on a channelized OC-12 MDA, you must provision the parent STS1-1 SONET path first.
The following shows the output:
In order to set the channelized mode on a port, the DS3 parameter must be in a shut down state. Clear channel uses out-of-band signaling, not in-band signaling, so the channel's entire bit rate is available. Channelized ports use in-band signaling and must be explicitly enabled.
The following shows an example of the output:
In the TDM context, configure DS0 channel groups parameters. 24 timeslots can be configured per channel group.
Services can be applied to the configured channelized ports. The following example shows the CLI usage to configure a customer IES service with interface SAPs on the channelized ports. Refer to the 7450 ESS, 7750 SR, and 7950 XRS Services Overview Guide for information about how to configure services.
The following output shows the channelized ports 5/2/1.1.1.1.1 and 5/2/1.1.1.1.2) applied to SAPs on the IES service configuration:
Configuring a Channelized Any Service Any Port (ASAP) OC3-SFP Port
This section provides examples to configure PPP, FR, cHDLC, and ATM n*DS0 channels on a channelized port on channelized ASAP OC-3 SFP MDA in slot 1/1/1. The ASAP OC-12 SFP MDA also supports the SONET options.
At this level you must choose the tributary. When provisioning DS3 nodes on a channelized ASAP OC-3 MDA, you must provision the parent STS1-1 SONET path first.
In order to set the channelized mode on a port, the DS3 parameter must be in a shut down state. Clear channel uses out-of-band signaling, not in-band signaling, so the channel's entire bit rate is available. Channelized ports use in-band signaling and must be explicitly enabled.
In the TDM E1 context, configure DS0 channel groups and their parameters. For a DS1 channel-group, up to 24 timeslots can be assigned (numbered 1 to 24). For an E1 channel-group, up to 31 timeslots can be assigned (numbered 2 to 32). For ATM, all timeslots are auto-configured when a channel group gets created (there is no sub-E1 for ATM). ATM, Frame Relay and BCP-NULL encapsulation examples follow:
Services can now be applied to the configured channelized ports. Follow examples of other channelized ports in this document.
Configuring Cisco HDLC on a Channelized Port
Use the following CLI syntax to configure cHDLC:
The following example shows SONET/SDH access mode configuration command usage:
The following example shows a configuration:
Configuring Channelized STM1/OC3 Parameters
The following example shows basic syntax to configure channelized STM1/OC3 parameters:
The following shows the configuration output:
Configuring Cpipe Port Parameters
Before a Cpipe service can be provisioned, the following entities must be configured:
Configuring a DS1 Port
The following shows an example of a DS1 port configured for CES.
Configuring a Channel Group
The following shows an example of a DS1 channel group configured for CES.
Configuring ATM SAPs
ATM SAP in an IES Service
The following shows a sample IES service SAP configuration:
ATM SAP in an Epipe Service
The following shows a sample Epipe service SAP configuration:
Configuring DWDM Port Parameters
The following shows a sample DWDM port configuration:
Configuring WaveTracker Parameters
The following example shows the default configuration with WaveTracker disabled:
The following example shows a configuration with DWDM channel 44, WaveTracker power control transmit power at -7.5 dBm and WaveTracker encoded keys 205 and 749.
The following is an example of the show port <portId> wavetracker command for the non-default WaveTracker configuration as shown above:
The following example shows the Wavetracker keys allowed for each DWDM channel:
Configuring OTU Port Parameters
The following example shows an OTU port configuration:
The following example shows the show port <portId> otu detail for the default OTU configuration as shown above:
The window over which the Bit Error Rate (BER) determined is based on the configured threshold level. The higher the error rate the shorter the window and as the error rate decreases the window increases. Table 32 lists the configured BER thresholds and corresponding window lengths.
Table 32: Configured BER Thresholds and Window Lengths
Configured BER Threshold | Window Length |
10^-3 | 8ms |
10^-4 | 8ms |
10^-5 | 8ms |
10^-6 | 13ms |
10^-7 | 100ms |
10^-8 | 333ms |
10^-9 | 1.66s |
Configuring ATM Interface Parameters
ATM interface parameters can only be configured for SONET/SDH ports/paths and TDM ports/channels supporting ATM encapsulation, and for IMA multilink bundles.
ATM interface parameters allow users to configure characteristics of an ATM interface. The Nokia routers support configuration of the following ATM interface characteristics:
- Cell-format — Allows user to select the ATM cell format to be used on a given interface: UNI/NNI
- ILMI — Allows user to enable/disable ILMI protocol
- Traffic-desc — Allows user to configure ILMI PVCC TM characteristics over a given ATM interface ingress and egress direction characteristics can be configured separately)
- Mapping — Allows user to select ATM cell mapping into an HDLC frame: Direct/PLCP
PLCP/Direct Mapping
Setting mapping to PLCP changes the effective speed of a DS3 interface to 40.704 M. When a port operates in a PLCP mode, the OCD events and LCD are not applicable (including related status fields and counters).
Similarly the below-defined PLCP statuses, alarms, counters do not apply for direct mapped ports.
When a path operates in the PLCP mode, the router supports the standard ATM MIB monitoring of the PLCP operations, for example:
- PLCP severely errored framing seconds
- PLCP alarm state
- PLCP unavailable seconds counter
Table 33 shows how SONET alarm status, path operational status, ATM interface and PLCP status and PLCP Alarm state interact.
Table 33: Alarm State Interactions
Content of the Received Signal | Status Field Values | ||||||||
Local Signal | Local Frame | Local Payld | Local PLCP Framing | Far End Framing | Far End PLCP Framing | Path Sonet Alarm Status | Path Oper Status | Atm Interface Oper Status | PLCP Alarm State |
Y | Y | Y | Y | Y | Y | None | Up | Up | No Alarm |
Y | Y | Y | Y | Y | Prob | None | Up | Lower Layer Down | Far End Alarm Rx |
Y | Y | Y | Y | Prob | Prob | RDI | Down | Lower Layer Down | Far End Alarm Rx |
Y | Y | Y | Prob | Y | N/A | None | Up | Lower Layer Down | Incoming LOF |
Y | Y | Y | Prob | Prob | N/A | RDI | Down | Lower Layer Down | Incoming LOF |
Y | Prob | N/A | N/A | N/A | N/A | LOF | Down | Lower Layer Down | Incoming LOF |
AIS | N/A | N/A | N/A | N/A | N/A | AIS | Down | Lower Layer Down | Incoming LOF |
Prob | N/A | N/A | N/A | N/A | N/A | LOS | Down | Lower Layer Down | Incoming LOF |
A DS3 path configured for PLCP mapping:
- Supports transmit and receive of the Ax, Px and C1 bits.
- Ignores the received Z1, Z2, Z3 octets of the PLCP frame and transmits all zeros in the Z1, Z2, Z3 octets of the PLCP frame.
- Ignores the received F1 octet of the PLCP frame, and transmits all zeros in the F1 octet of the PLCP frame.
- Samples and uses for performance monitoring received FEBE bits of G1 octet and transmits the number of BIP-8 errors detected by the receive framer using the FEBE bits of the G1 octet.Detects a PLCP Far End Alarm when 10 consecutive PLCP frames are received with the RAI bit set, and transmits a set RAI bit when the local port has declared PLCP-LOF. When the local port declares PLCP-LOF is cleared, the outgoing RAI bit is cleared.
- Ignores the received X bits of the G1 octet, and transmits all zeros in the X bits of the G1 octet of the PLCP frame.
- Ignores the received M1 and M2 octets and transmits all zeros in the M1 and M2 octets of the PLCP frame.
ATM Interface Configurations
Use the following CLI syntax to configure ATM interface parameters for SONET/SDH paths:
Use the following CLI syntax to configure ATM interface parameters for IMA bundles.
Use the following CLI syntax to configure ATM interface parameters for TDM channels:
Configuring Frame Relay Parameters
Frame Relay pipes are used to provide customer-to-customer Frame Relay PVCs or to interconnect individual Frame Relay clouds.
Frame Relay parameters can only be configured in SONET/SDH and channelized TDM MDA contexts.
The following example shows a channelized interface configuration:
SONET/SDH Interfaces
This section applies also to FR interfaces on Sonet/SDH high-speed channels on ASAP MDAs. In order to configure Frame Relay on the associated port/channel, the frame-relay encapsulation type must be specified.
The following output shows a Frame Relay encapsulation type and the Frame Relay defaults.
Configuring Multilink PPP Bundles
Multilink bundles can have from 1 to 8 members (ports) specified. The bundles aggregate channelized ports which define available bandwidth to carry data over a DS1 channel. 56 multilink bundles can be configured per MDA. 256 MLPPP groups are supported per ASAP MDA. Each bundle represents a single connection between two routers.
Multilink bundling is based on a link control protocol (LCP) option negotiation that permits a system to indicate to its peer that it is capable of combining multiple physical links into a bundle.
Multilink bundling operations are modeled after a virtual PPP link-layer entity where packets received over different physical link-layer entities are identified as belonging to a separate PPP network protocol (the Multilink Protocol, or MP) and recombined and sequenced according to information present in a multilink fragmentation header. All packets received over links identified as belonging to the multilink arrangement are presented to the same network-layer protocol processing machine, whether they have multilink headers or not.
When you configure multilink bundles, consider the following guidelines:
- Multilink bundle configuration should include at least two ports.
- A maximum of 8 ports can be included in a multilink bundle.
- Multilink bundles can only be aggregated on a single MDA.
Configuring Multilink ATM Inverse Multiplexing (IMA) Bundles
IMA bundles are supported on Channelized ASAP MDAs. The bundles aggregate E1 or DS1 ATM channels into a single logical ATM interface.
IMA Bundles
Use the following CLI syntax to configure IMA bundle parameters:
Configuration notes:
An IMA group has common interface characteristics (for example, configuration that applies to a logical ATM interface either configured via the IMA group context or taken from the primary link) The following list details those common IMA group interface characteristics:
- Encapsulation type (ATM)
- ATM interface characteristics (under the ATM menu context)
- Interface mode type (only access is supported)
- MTU value (derived from the primary link)
Member links inherit those common characteristics from the IMA group that they are part of and as long as they are part of an IMA group. Characteristics derived from the primary link (MTU, interface mode type) can be changed on the primary link only and not on other links in the bundle or a bundle itself. The primary link is the member which has the lowest ifindex. When a member is added/deleted the primary member may be changed based on ifIndicies of all member links.
Once a path becomes part of an IMA group logical link, the path ceases to exist as a physical ATM path interface. This means that:
- ATM interface bundle characteristics enforced over the link. Note that when a link is removed from an IMA bundle, the link's ATM characteristics are reset to ATM interface defaults.
- No services can be configured on the member link itself.
After the primary member has been added each additional member added to the group will only be accepted if it matches the configuration of the IMA group. ATM interface characteristics are not part of this verification as they are overwritten/reset to defaults when a link is added to/removed from an IMA bundle.
Upon addition to an IMA group, each added member is automatically assigned an IMA link Id. IMA link Ids are in range from 0 to 7 and stay constant as long as the router does not reboot.
When configuring IMA bundles, consider the following guidelines:
- IMA bundles should contain at least two members.
- A maximum of eight members can be included in an IMA bundle.
- IMA links can only be aggregated into a bundle within a single MDA.
- IMA group maximum bandwidth and minimum link settings allows, by default, for over-subscription of shaped services; however when that occurs scheduling of traffic over an IMA group ATM interface degrades to round-robin between shaped services, therefore to preserve full ATM TM even during a member link failure, it is recommended that maximum bandwidth is set to minimum links.
- When configuring the red differential delay for IMA groups on ASAP MDAs, the value configured is converted into acceptable frame sequence number delay on a link since delay is granular to IMA frame sequence number difference. For E1 channels (receiving frame time 27 ms), configured values map to the enforced values as follows: 0 ms maps to 0 frame sequence number difference (27 ms delay), 1 to 27 ms maps to 1 frame sequence number difference (54 ms delay), 28 - 50 ms maps to 2 frame sequence number difference (81 ms delay). Similarly, for DS1 channels (receiving frame time 35 ms), configured values map to enforced values as follows: 0 ms maps to 0 frame sequence number difference (35 ms delay), 1 to 35 ms maps to 1 frame sequence number difference (70 ms delay), 36 to 50 ms maps to 2 frame sequence number difference (105 ms delay).
- When a channel is deleted from an IMA group it is recommended that a deletion takes place at the far end first when the far end supports graceful deletion to ensure no cell loss takes place on the 7750 SR RX end of the channel. When a channel is deleted on the 7750 SR end first, a small data loss will take place on the 7750 SR RX side (depending on the time required for the far end to deactivate its TX on the link being deleted).
- When no member links are configured on an IMA group, the speed of an E1 channel will be used to compute the maximum IMA group bandwidth that may be allocated to shaped services.
- The shutdown command for IMA groups sets the IMA group state to “Blocking”. This makes the group operationally down but will not bring down the individual IMA links. Services configured on the IMA group will go operationally down as well.
- The 7750 SR supports automatic IMA version changing when the far end IMA group version matches the configured version. The group will remain operationally down until one of the IMA groups changes version.
- When adding member links to an IMA group, the clock-source of the e1 or ds1 link must be set to node-timed.
The following example shows the creation of an IMA bundle with 3 group members residing on a channelized OC-3 ASAP MDA in slot 5/2/1:
Multi-Class MLPPP
The following guidelines apply to multi-class MLPPP:
- MC-MLPPP must be configured before links are added to a bundle.
- MC-MLPPP and LFI (config>port>ml-bundle>interleave-fragments) are mutually exclusive.
- MC-MLPPP is not supported when port is configured as network mode.
- MC-MLPPP can be enabled on every MLPPP bundle and bundle protection group.
- MC-MLPPP is supported only on ASAP MDAs (for example, m4-choc3-as-sfp, m1-choc12-as-sfp, m4-chds3-as, m12-chds3-as).
- Short and long sequence packet formats are supported (both ends must be of the same type) with static mapping of forwarding classes to MC-MLPPP class (based on the number of classes negotiated with the far end).
- Single fragment size for all classes is supported.
- Prefix elision is not supported. The prefix elision (compressing common header bytes) option advises the peer that, in each of the given classes, the implementation expects to receive only packets with a certain prefix; this prefix is not to be sent as part of the information in the fragment(s) of this class.
- Fractional DS1/E1 MLPPP links are supported. This is applicable to MLPPP bundles on ASAP MDAs. Fractional E1 and Fractional DS1 links cannot be combined in the same bundle.
IMA Test Procedure
Use the following CLI commands to perform an IMA Test Pattern Procedure on a member link of an IMA group:
An operator can deploy IMA test procedures to verify operations of IMA group and its member links. The following is a list of key points about the test pattern procedure:
- The test procedure is performed as defined by the IMA specification version 1.1, i.e. a test pattern is sent over the specified link and is expected to be looped back over all the links in the group. ICP cells are used to perform the test.
- The test procedure is not traffic affecting, for example, data traffic will not be affected by the ongoing test.
- There can only be a single test executed per an IMA group at any given time
- The IMA member link must exist in the specified group for the command to be accepted.
- The test-pattern-procedure must be shutdown before a new test-link value or test pattern is accepted.
- The current IMA group test pattern configuration and result of a given IMA test can be seen by executing a show command for the IMA group. A test-link result can have three values:a. Disabled: The test-link is currently not running.b. Operating: The test pattern procedure is no shutdown and there are currently no failed-links for this running test-pattern-procedure.c. Link-Failed: One or more links have failed the test-pattern-procedure. Execute a show port <slot/mda/port.sonet-sdh-index> ima-link command to see the failed link and received pattern value.
- Deleting a member link that is the same as the specified test-link, to stay in compliance with key point 4, will result in the test-link value being reset to default.
- IMA test procedure configurations are not saved when the admin save command is executed.
Configuring Bundle Protection Group Ports
Bundle Protection groups enable APS protection of one bundle residing on a working circuit of an APS group port by another bundle residing on the protection circuit of that APS group port. Bundle protection groups apply to MLPPP as well, and are configured the same way. The following examples show the process to configure BPGrp on ASAP MDAs to provide an APS protection for an IMA/MLPPP bundle.
First, two ASAP MDAs must be configured.
Configure an APS group with working and protection circuits on the ASAP MDAs.
Create eight ATM DS1 channels on the APS group.
Next, configure an IMA-type/MLPPP-type BPGrp with working and protection bundles on working and protection circuits of aps-1 and members the created DS1s (this creates 2 IMA bundles, one on working and one on protection circuit):
Finally, a service can be configured on this bundle using the BPGrp ID (for example, an ATM VC 0/32 SAP would be: sap bpg-ima-1:0/32).
Configuration Notes and Guidelines:
- Any configuration on a BPGrp applies to both the working and protection bundle.
- Working and protection bundles can be shutdown individually.
- Services cannot be configured on a BPGrp until at least one member link has been configured.
- The published switchover times for bundle protection groups on the router are dependent on the far end being able to recover from cell loss within that time. To ensure this, the following recommendations are given:
- The BPGrp link activation timer should be configured to a value small enough to allow a quick recovery from any IMA failure occurring during the switchover. A recommended value is 1 second.
- The ADM that terminates APS should support standard APS switchover time requirements.
- The far end IMA/MLPPP links must be able to tolerate cell loss during APS switchover without bringing links down. This includes, for example, a combination of link activation/deactivation and appropriate configuration of TDM/SONET debounce timers.
- Because of the temporary cell loss during the APS switchover, the far end IMA/MLPPP will experience a misalignment between individual links within an IMA/MLPPP group. The far end IMA/MLPPP group must support fast-realignment of links without having to bring the links down. The router synchronizes the IMA/MLPPP streams the far end receives between switchovers in an effort to cause the least amount of misalignment.
- To increase the BPGrp robustness, it is recommended to provision more IMA/MLPPP links than is required and set the minimum links and max bandwidth parameters to the number of required links. This type of configuration is required on the far end as well.
Configuring a Channelized DS1 Card
The 7750 SR-c12 and 7750 SR-c4 support channelized DS-1 cards. The channelization is as follows:
- N*DS0 in DS1 port.{1..24}
- N*DS0 in E1 port.{1..32}
To make sure you have a channel-capable MDA or CMA, verify the MDA-type that you are configuring by entering a show mda slot-id command.
In the following example, MDA 7 shows a channelized DS1 CMA.
In the TDM E1 context, configure DS0 channel groups and their parameters. For a DS1 channel-group, up to 24 timeslots can be assigned (numbered 1 to 24). For an E1 channel-group, up to 31 timeslots can be assigned (numbered 2 to 32). For ATM, all timeslots are auto-configured when a channel group gets created (there is no sub-E1 for ATM). ATM, Frame Relay and BCP-NULL encapsulation examples follow:
Services can now be applied to the configured channelized ports.
Configuring LAG Parameters
LAG configurations should include at least two ports. Other considerations include:
- A maximum of 64 ports (depending on IOM type, chassis-mode and lag-id) can be included in a LAG. All ports in the LAG must share the port characteristics inherited from the primary port.
- Autonegotiation must be disabled or set limited mode for ports that are part of a LAG to guarantee a specific port speed.
- Ports in a LAG must be configured as full duplex.
The following example shows LAG configuration output:
Configuring BFD on LAG Links
BFD can be configured under the LAG context to create and establish the micro-BFD session per link after the LAG and associated links have been configured. An IP interface must be associated with the LAG or a VLAN within the LAG, if dot1q encapsulation is used, before the micro-BFD sessions can be established.
Complete the following steps to enable and configure BFD over the individual LAG links:
- Enable BFD within the LAG context, which also enters the CLI into the BFD context
- Configure the address family which is to be used for the micro BFD sessions. Only one address family can be configured per LAG
- Configured the local-IP address to be used for the BFD sessions
- Configure the remote-IP address to be used for the BFD sessions
When configuring the local and remote IP address for the BFD over LAG link sessions, the local-ip parameter should always match an IP address associated with the IP interface to which this LAG is bound. In addition, the remote-ip parameter should match an IP address on the remote system and should also be in the same subnet as the local-ip address. If the LAG bundle is re-associated with a different IP interface, the local-ip and remote-ip parameters should be modified to match the new IP subnet. The local-ip and remote-ip values do not have to match a configured interface in the case of tagged LAG/ports.
The optional parameters that can be configured for the BFD over LAG links include:
- Transmit Interval
- Receive Interval
- Multiplier
- Max-Wait-for-Up-Time - This parameter controls how long a link will remain active if BFD is enabled after the LAG and associated links are active and in a forwarding state.
- Max-Time-Admin-Down - This parameter controls how long the system will wait before bringing the associated link out of service if an admin down message is received from the far-end.
The following is a sample configuration:
Configuring G.8031 Protected Ethernet Tunnels
Ethernet tunnel configuration can include at most two paths. Other considerations include:
- A path contains one member port and one control-tag (backbone VLAN ID/BVID)
- If the operator wants to replace an existing member port or a control-tag, the whole path needs to be shutdown first. The alternate path will be activated as a result keeping the traffic interruption to a minimum. Then the whole path must be deleted and re-created. To replace an existing member port or control tag, the whole path needs to be shutdown first. The alternate path will be activated as a result keeping traffic interruption to a minimum. Then the whole path must be deleted, the alternate path precedence modified to primary before re-creating the new path.
- The Ethernet tunnel will inherit the configuration from the first member port. The following port-level configuration needs to be the same between member ports of an Ethernet tunnel:
- config>port>ethernet>access>{ingress|egress}>queue-group
- config>port>ethernet>egress-scheduler-policy
- config>port>access>egress>pool
- config>port>ethernet>dot1q-etype
- config>port>ethernet>qinq-etype
- config>port>ethernet>pbb-etype
- config>port>ethernet> mtu
- The operator can update these port parameters only if the port is the sole member of an Ethernet tunnel. This means that in the example below, the operator needs to remove port 1/1/4 and port 1/1/5 before being allowed to modify 1/1/1 for the above parameters.
The following example shows eth-tunnel configuration output:
Service Management Tasks
This section discusses basic procedures of the following service management tasks:
Modifying or Deleting an MDA, MCM, CMA or XMA
To change an MDA, MCM, CMA, or XMA type already provisioned for a specific slot or card, first you must shut down the slot/MDA/port configuration and then delete the MDA,MCM, CMA, or the XMA from the configuration.
To modify or delete CMAs or XMAs, use the MDA command structure.
Use the following CLI syntax to modify an MDA on the 7450 ESS and 7750 SR platforms (or an XMA on the 7950 XRS platforms):
| Note: You do not have to shutdown and remove an MCM to remove or modify an MDA on the 7750 SR. Use the following sequence if changing the MCM type or slot configuration. |
Modifying a Card Type
In order to modify the card type already provisioned for a specific slot, you must shutdown existing port configurations and shutdown and remove all MDA, XMA, or CMA configurations. For 7750 SR-c12/c4 systems, after removing MDA configurations, shutdown and remove the MCM from service before modifying the card.
Note that CMAs do not require an MCM, therefore, if removing a CMA-type MDA from service, it is not required to shutdown and remove an MCM before modifying the card.
You must reset the IOM after changing the MDA type from MS-ISA to any other MDA type.
Use the following CLI syntax to modify a card type already provisioned for a specific slot:
Deleting a Card
To delete a card type provisioned for a specific slot, you must shutdown existing port configurations and shutdown and remove all MDA, XMA, or CMA configurations. For 7750 SR-c12/c4 systems, after removing MDA configurations, you can shutdown and remove the MCM from service before modifying the card.
Use the following CLI syntax to delete a card provisioned for a specific slot:
Deleting Port Parameters
Use the following CLI syntax to delete a port provisioned for a specific card or CMA:
Soft IOM Reset
This section provides basic procedures for the following service management tasks:
Soft Reset
Soft reset is an advanced high availability feature that greatly reduces the impact of IOM/IMM resets either during a software upgrade or during other maintenance or debug operations. The combination of In Service Software Upgrade (ISSU) and Soft reset maximizes service availability in an operational network.
A soft reset re-initializes the control plane while the data plane continues operation with only very minimal impact to data forwarding. During the soft reset some processes that rely on the IOM control plane will not run for a duration that is similar to the duration of an IOM Hard reset. These processes include the updating of the IP forwarding table on the IOM (IP FIB downloads from the CPM), Layer 2 learning of new MAC addresses on the IOM, updating of the MAC forwarding table (for MAC addresses learned from other IOMs), ARP, Ethernet OAM 802.3ah, LLDP and handling for certain ICMP functions such as Can’t Fragment, Redirect, Host Unreachable, Network Unreachable and TTL Expired. Note that protocols and processes on the CPM continue to operate during a Soft Reset (BGP continues to learn new routes from peers, and the new routes will be downloaded to the IOM once the Soft Reset has completed).
The combination of the very small data plane impact and special soft reset enhancements for protocols ensures that most protocols do not go down and no visible impacts to most protocols are detected externally to the SR/ESS platforms. BFD timers are temporarily increased for the duration of a soft reset in order to keep BFD sessions up. Protocols such as BGP, OSPF, IS-IS, PIM, etc with default timers remain up. A protocol using aggressive timers may go down momentarily during a soft reset.
Although the majority of protocols stay up during a Soft Reset, there are some limitations for a few protocols. Refer to the Known Limitations section of the Release Notes for the relevant release for details.
The soft IOM reset procedure is applicable during the ISSU process and for a manual soft reset procedure.
To manually perform a soft IOM reset, enter the clear card slot-number soft command.
Soft Reset is supported on Ethernet IMMs and on IOMs that have Ethernet MDAs provisioned. The operator can optionally force a Soft Reset on an IOM that contains at least one MDA that supports Soft Reset but also has an MDA that does not support Soft Reset or is operationally down. To force Soft Reset in this case the hard-reset-unsupported-mdas is used and the supported MDAs and the card itself are soft reset while the MDAs that do not support soft reset (or are operationally down) are hard reset.
The show card and show mda commands indicate that a soft IOM reset is occurring during the soft reset process.
Soft Reset is not supported on the 7750 SR-c4. On the 7750 SR-c12, Soft Reset is not supported but the ISSU procedure will avoid resetting soft reset capable MDAs/CMAs (as long as there is not new firmware for the CMA/MDA in the new image).
Deferred MDA Reset
As part of an ISSU, soft reset is supported even if the (old) firmware version on the MDAs is not the same as the (new) firmware version in the software load to which the operator is upgrading. The soft reset is allowed to proceed by leaving the previous version of the firmware running while upgrading the rest of the MDA/IOM/IMM. The operator can then issue a hard reset of the MDA/IMM at some time in the future to upgrade the firmware.
The soft reset is only allowed to proceed if the older firmware is compatible with the new IOM/IMM software load. Otherwise the soft reset is blocked and a hard reset must be used instead.
After a soft reset has been completed, a log event will be raised to warn the operator that the MDA (or IMM) is running older firmware and that they can perform a hard reset of the MDA (or IMM) at some point if required.
If the MDA/IMM is not hard reset by the operator, and then a software upgrade is performed, and the older firmware is no longer compatible with the newest load being upgraded to, then the soft reset will be blocked (or an automatic hard reset will occur for Major ISSU).
The operator can see whether they are running with older MDA/IMM firmware at any time by using the show mda detail command.