3. Installing containers
This chapter provides an overview of container installation tasks. Container installation tasks include:
- Launches a single SR Linux container using a manual procedure.
- Launches a container topology using an automated script.
3.1. Container installation prerequisites
Ensure that prerequisites are met before installing an SR Linux container or container topology.
Minimum system requirements:
- Centos 7.4 system, Kernel 4.17
- 8 GB RAM
- 8 core CPU
- The host machine user should have sudo privileges (preferably passwordless)
Minimum software requirements:
- Docker CE installed, minimum version 18.09:
- Python version 3.6 or higher
- license key file available
- docker-topo-master.tgz file (if building SR Linux container topology)
- srlinux-vX.Y.Z-N.tar.xz file (for the SR Linux docker image)where X=Major, Y=Minor, Z=Patch, and N=Build Number
3.2. Launching a container manually
This procedure manually launches a single container.
- Copy the srlinux-vX.Y.Z-N.tar.xz file into ~/ of the Centos 7 Host Machine.
- Copy the license.key into ~/license.key.
- Load the docker image. To load the image, the user must have root privilege, or be part of the docker group.$ docker image load -i ~/srlinux-vX.Y.Z-N.tar.xz
- Check that the docker image was imported correctly:$ docker imagesExample:REPOSITORY TAG IMAGE ID CREATED SIZEsrlinux 19.11.1- 3e77d45745f2 7 hours ago 1.3GB
- Launch an instance of the SR Linux container on the host using the options in the following command line. This command must be entered in a single line. See the Note that follows about copying text from a PDF file without broken lines.$ docker run -t -d --rm --privileged \--sysctl net.ipv6.conf.all.disable_ipv6=0 \--sysctl net.ipv4.ip_forward=0 \--sysctl net.ipv6.conf.all.accept_dad=0 \--sysctl net.ipv6.conf.default.accept_dad=0 \--sysctl net.ipv6.conf.all.autoconf=0 \--sysctl net.ipv6.conf.default.autoconf=0 \-u $(id -u):$(id -g) \-v ~/license.key:/opt/srlinux/etc/license.key:ro \--name srlinux_dut1 srlinux:vX.Y.Z-Nsudo bash -c ‘/opt/srlinux/bin/sr_linux'where X=Major, Y=Minor, Z=Patch, and N=Build Number for srlinux:vX.Y.Z-N

Note: Copying a long command string from a PDF file will introduce line breaks. As a workaround, copy the text string and place into Notepad++. Highlight the text and select CTRL+J. The result is a single line with no returns.
- Check that the docker container has been created with the name ‘srlinux’:$ docker psExample:CONTAINER ID IMAGE COMMAND CREATED STATUS PORTS NAMES9d5dbd03f7f8 srlinux:19.11.1 "/tini--fixuid-q.." 3 mins ago Up3 mins. srlinux_dut1
- Turn off the Docker0 Tx checksum offload:# sudo ethtool --offload docker0 tx off
- Open an SSH session to the DUT using the following credentials:
- username: admin
- password: admin
Example:# ssh admin@$(docker inspect srlinux_dut1 --format {{.NetworkSettings.IPAddress}})admin@172.17.0.4's password:___ ___ ___ ___ ___/ /\ / /\ ___ /__/\ /__/\ /__/|/ /:/_ / /::\ ___ / /\ \ \:\ \ \:\ | |:|/ /:/ /\ / /:/\:\/__/\ / /:/ \ \:\ \ \:\ | |:|/ /:/ /::\ / /:/~/:/\ \:\ __/__/::\ _____\__\:\ ___ \ \:\ __|__|:|/__/:/ /:/\:/__/:/ /:/__\ \:\ / \__\/\:\ /__/::::::::/__/\ \__\:/__/::::\____\ \:\/:/~/:\ \:\/:::::/\ \:\ / /:/ \ \:\/\ \:\~~\~~\\ \:\ / /:/ ~\~~\::::/\ \::/ /:/ \ \::/~~~~ \ \:\ /:/ \ \:\/\ \:\ ~~~ \ \:\ /:/ |~~|:|~~\__\/ /:/ \ \:\ \ \:\/:/ \__\::/\ \:\ \ \:\/:/ | |:|/__/:/ \ \:\ \ \::/ /__/:/ \ \:\ \ \::/ | |:|\__\/ \__\/ \__\/ \__\/ \__\/ \__\/ |__|/Hello admin,Welcome to the srlinux CLI.Type 'help' (and press <ENTER>) if you need any help using this.--{ running }--[ ]-- - Verify the application versions running on the system:# info from state system app-management application * | as table | filter fields pid author versionExample:A:3-node-srlinux-A# info from state system app-management application * |as table | filter fields pid author version+---------------------+---------+------------+------------------------+| Name | Pid | Author | Version |+=====================+=========+============+========================+| aaa_mgr | 2189 | Nokia | v20.6.0-13-gc6a313b84c || acl_mgr | 2198 | Nokia | v20.6.0-13-gc6a313b84c || app_mgr | 2131 | Nokia | v20.6.0-13-gc6a313b84c || arp_nd_mgr | 2207 | Nokia | v20.6.0-13-gc6a313b84c || bfd_mgr | | | || bgp_mgr | 2650 | Nokia | v20.6.0-13-gc6a313b84c || chassis_mgr | 2216 | Nokia | v20.6.0-13-gc6a313b84c || dev_mgr | 2155 | Nokia | v20.6.0-13-gc6a313b84c || dhcp_client_mgr | 2228 | Nokia | v20.6.0-13-gc6a313b84c || fib_mgr | 2237 | Nokia | v20.6.0-13-gc6a313b84c || gnmi_server | 2473 | Nokia | v20.6.0-13-gc6a313b84c || idb_server | 2180 | Nokia | v20.6.0-13-gc6a313b84c || isis_mgr | | | || json_rpc | 2476 | Nokia | v20.6.0-13-gc6a313b84c || l2_mac_learn_mgr | 2248 | Nokia | v20.6.0-13-gc6a313b84c || l2_mac_mgr | 2258 | Nokia | v20.6.0-13-gc6a313b84c || l2_static_mac_mgr | | | || lag_mgr | 2267 | Nokia | v20.6.0-13-gc6a313b84c || linux_mgr | 2276 | Nokia | v20.6.0-13-gc6a313b84c || lldp_mgr | 2657 | Nokia | v20.6.0-13-gc6a313b84c || log_mgr | 2285 | Nokia | v20.6.0-13-gc6a313b84c || mcid_mgr | 2294 | | || mgmt_server | 2303 | Nokia | v20.6.0-13-gc6a313b84c || mpls_mgr | | | || net_inst_mgr | 2312 | Nokia | v20.6.0-13-gc6a313b84c || oam_mgr | 2325 | Nokia | v20.6.0-13-gc6a313b84c || ospf_mgr | | Nokia | || plcy_mgr | 2667 | Nokia | v20.6.0-13-gc6a313b84c || qos_mgr | 2471 | Nokia | v20.6.0-13-gc6a313b84c || sdk_mgr | 2335 | Nokia | v20.6.0-13-gc6a313b84c || sshd-mgmt | 2923 | | || static_route_mgr | 2674 | Nokia | v20.6.0-13-gc6a313b84c || supportd | 2140 | Nokia | v20.6.0-13-gc6a313b84c || vrrp_mgr | | | || xdp_cpm | 2349 | Nokia | v20.6.0-13-gc6a313b84c || xdp_lc_1 | 2365 | Nokia | v20.6.0-13-gc6a313b84c |+---------------------+---------+------------+------------------------+
3.3. Launching a container topology
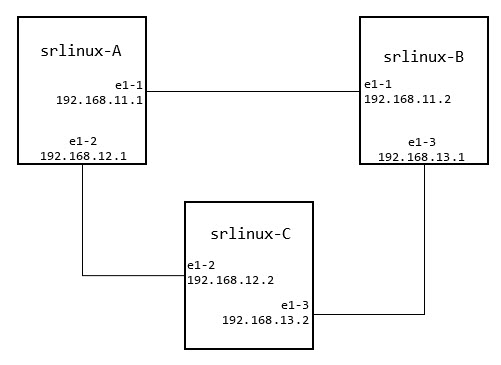
This procedure launches a container topology using an automated script. See Figure 1 for a topology example.
Figure 1: Example 3 node container topology
| Note: The docker-topo uses the SR Linux license at ~/docker-topo-master/topo-extra-files/examples/v2/config/license.key. |
- Copy the file srlinux-vX.Y.Z-N.tar.xz into ~/ of the Centos 7 Host Machine.
- Load the docker image:$ docker image load -i ~/srlinux-vX.Y.Z-N.tar.xzExample:~ $ docker image load -i srlinux-vX.Y.Z.tar.xzba6c2307b523: Loading layer 329.1MB/329.1MB53a1d27f1cbd: Loading layer 5.12kB/5.12kBb1cfd1c17e46: Loading layer 311.3kB/311.3kB559e14cb1ef4: Loading layer 303.1kB/303.1kB99b5d14edc41: Loading layer 4.015MB/4.015MBb89e0ee26076: Loading layer 3.072kB/3.072kBba4b6c40087a: Loading layer 2.56kB/2.56kB4f529c55a3c9: Loading layer 2.56kB/2.56kB9637194042f7: Loading layer 7.68kB/7.68kB34eed33aab83: Loading layer 25.6kB/25.6kB964b072de0ec: Loading layer 25.6kB/25.6kBac434023ca76: Loading layer 3.072kB/3.072kBae35e17f1206: Loading layer 3.072kB/3.072kB7f230658f8b8: Loading layer 3.072kB/3.072kB78f9091adeb6: Loading layer 2.56kB/2.56kBb8f40a106975: Loading layer 3.072kB/3.072kB238c0f5a7a42: Loading layer 3.072kB/3.072kBc607a3d0a237: Loading layer 3.072kB/3.072kB00f1c823da02: Loading layer 3.072kB/3.072kB068f6071eab8: Loading layer 403.9MB/403.9MB1963843423a6: Loading layer 3.072kB/3.072kBLoaded image: srlinux:v<release>-190
- Check that the docker image was imported correctly:$ docker imagesExample:REPOSITORY TAG IMAGE ID CREATED SIZEsrlinux 19.11.1 3e77d45745f2 7 hours ago 1.3GB
- Create a docker-topo-master folder with the required files, using the following command:# cd ~; tar -zxvf docker-topo-master.tar.gz
- Change directories to the docker-topo-master directory:cd ~/docker-topo-master
- In the docker-topo-master directory, install docker-topo using:# sudo python3.6 setup.py installNote: If you encounter an error creating a directory or file, check the directory permissions.
- The image name SRLINUX_IMAGE: srlinux:vX.Y.Z-N is defined by default. If a different name is required, edit the image name in file ~/docker-topo-master/topo-extra-files/examples/v2/3-node.yml.Example (image filename location):VERSION: 2driver: vethPREFIX: 3-nodeSRLINUX_IMAGE: srlinux:19.11.1PUBLISH_BASE: 9000links:- endpoints: ["srlinux-A:e1-1", "srlinux-B:e1-1"]- endpoints: ["srlinux-A:e1-2", "srlinux-C:e1-2"]- endpoints: ["srlinux-B:e1-3", "srlinux-C:e1-3"]
- Important: If there are already existing containers with 3-node.yml, they need to be destroyed before creating the new 3-node topology. See Destroying an existing topology for this procedure.If there is no existing topology (or an existing topology is destroyed), create a 3-node topology using:$ docker-topo --create topo-extra-files/examples/v2/3-node.ymlExample:$ docker-topo --create topo-extra-files/examples/v2/3-node.ymlINFO:__main__:Version 2 requires sudo. Restarting script with sudoINFO:__main__:alias srlinux-A='ssh -o UserKnownHostsFile=/dev/null -o StrictHostKeyChecking=no admin@$(docker inspect 3-node-srlinux-A --format "{{range .NetworkSettings.Networks}}{{.IPAddress}}{{end}}")'$ alias srlinux-B='ssh -o UserKnownHostsFile=/dev/null -o StrictHostKeyChecking=no admin@$(docker inspect 3-node-srlinux-B --format "{{range .NetworkSettings.Networks}}{{.IPAddress}}{{end}}")'$ alias srlinux-C='ssh -o UserKnownHostsFile=/dev/null -o StrictHostKeyChecking=no admin@$(docker inspect 3-node-srlinux-C --format "{{range .NetworkSettings.Networks}}{{.IPAddress}}{{end}}")'INFO:__main__:All devices started successfully
Note: Topology for 1-Node and 2-Nodes can also be built using the following commands:
- For 2-Node: $ docker-topo --create topo-extra-files/examples/v2/2-node.yml
- For 1-Node: $ docker-topo --create topo-extra-files/examples/v2/1-node.yml
- Using the output from the previous step, create login shortcut commands.Example:$ alias srlinux-A='ssh -o UserKnownHostsFile=/dev/null -o StrictHostKeyChecking=no admin@$(docker inspect 3-node-srlinux-A --format "{{range .NetworkSettings.Networks}}{{.IPAddress}}{{end}}")'$ alias srlinux-B='ssh -o UserKnownHostsFile=/dev/null -o StrictHostKeyChecking=no admin@$(docker inspect 3-node-srlinux-B --format "{{range .NetworkSettings.Networks}}{{.IPAddress}}{{end}}")'$ alias srlinux-C='ssh -o UserKnownHostsFile=/dev/null -o StrictHostKeyChecking=no admin@$(docker inspect 3-node-srlinux-C --format "{{range .NetworkSettings.Networks}}{{.IPAddress}}{{end}}")'
- Once the shortcut is created, use the alias command to open the CLI with the alias name. Enter admin as the username and password. For example, to open srlinux-A CLI, enter:$ srlinux-AExample:$ srlinux-AWarning: Permanently added '172.18.18.2' (RSA) to the list of known hosts.admin@172.18.18.2's password:Hello admin,Welcome to the srlinux CLI.Type 'help' (and press <ENTER>) if you need any help using this.--{ running }--[ ]--
- Check that new nodes are up and running:$ docker ps -aExample:$ docker ps -aCONTAINER ID IMAGE COMMAND CREATED STATUS PORT NAMES2505ea85a702 srlinux:v0.1.0-198 " /tini -- fixuid -q …"2 mins ago Up 2 minutes 3-node-srlinux-Af8a0b21f126d srlinux:v0.1.0-198 " /tini -- fixuid -q …"2 mins ago Up 2 minutes 3-node-srlinux-Bb30f6326c87b srlinux:v0.1.0-198 " /tini -- fixuid -q …"2 mins ago Up 2 minutes 3-node-srlinux-C
- Access the CLI for the nodes.
- Using the shortcut command created in Step 9:srlinux-A
- If the shortcut was not created, use the docker exec command:$ docker exec -it 3-node-srlinux-A sr_cli
- Using the full SSH command, as shown in the output after the container creation:$ ssh -o UserKnownHostsFile=/dev/null -o StrictHostKeyChecking=no admin@$(docker inspect 3-node-srlinux-A --format "{{range .NetworkSettings.Networks}}{{.IPAddress}}{{end}}")
Note: If the CLI prompt does not come up immediately, adjust the terminal window size. This is a known Docker issue.
- Verify that the interface and IP addresses exist on all nodes:
- enter running
- info interface <interface name>
- info network-instance <instance name>
Example:# enter running--{ running }--[ ]--# info interface *interface ethernet-1/1 {admin-state enablesubinterface 1 {admin-state enableipv4 {dhcp-client falseaddress 192.168.11.1/30 {}}}}interface ethernet-1/2 {admin-state enablesubinterface 1 {admin-state enableipv4 {dhcp-client falseaddress 192.168.12.1/30 {}}}}interface mgmt0 {admin-state enablesubinterface 0 {admin-state enableipv4 {dhcp-client true}ipv6 {dhcp-client true}}}--{ running }--[ ]-# info network-instance *network-instance mgmt {type ip-vrfadmin-state enabledescription "Management network instance"ip-forwarding {receive-ipv4-check truereceive-ipv6-check true}interface mgmt0.0 {}protocols {linux {export-routes trueexport-neighbors true}}}network-instance red {type ip-vrfadmin-state enableip-forwarding {receive-ipv4-check truereceive-ipv6-check true}interface ethernet-1/1.1 {}interface ethernet-1/2.1 {}protocols {linux {export-routes trueexport-neighbors true}}static-routes {route 192.168.13.0/24 {admin-state enablemetric 1preference 5next-hop-group static-ipv4-grp}}next-hop-groups {ecmp {max-paths-level-2 1}group static-ipv4-grp {admin-state enablecollect-stats falsenexthop 1 {ip-address 192.168.12.2admin-state enableresolve true}nexthop 2 {ip-address 192.168.11.2admin-state enableresolve true}}}}--{ running }--[ ]-- - Ping different nodes to verify connectivity:ping <IP Address> network-instance <instance name>Example:--{ running }--[ ]--# ping 192.168.11.1 network-instance redPinging 192.168.11.1 in srbase-redPING 10.0.0.0 (192.168.11.1) 56(84) bytes of data.64 bytes from 192.168.11.1: icmp_seq=1 ttl=64 time=1.74 ms64 bytes from 192.168.11.1: icmp_seq=2 ttl=64 time=0.596 ms64 bytes from 192.168.11.1: icmp_seq=3 ttl=64 time=0.664 ms64 bytes from 192.168.11.1: icmp_seq=4 ttl=64 time=0.710 ms^C--- 192.168.11.1 ping statistics ---4 packets transmitted, 4 received, 0% packet loss, time 3001msrtt min/avg/max/mdev = 0.596/0.927/1.740/0.471 ms
3.4. Destroying an existing topology
Destroy an existing topology using the docker-topo --destroy command. Destroy the created topology using the following command:
$ docker-topo --destroy topo-extra-files/examples/v2/3-node.yml