4.5. Configuring a VPLS Service with CLI
This section provides information to configure VPLS services using the command line interface.
4.5.1. Basic Configuration
The following fields require specific input (there are no defaults) to configure a basic VPLS service:
- Customer ID (refer to Configuring Customer Accounts)
- For a local service, configure two SAPs, specifying local access ports and encapsulation values.
- For a distributed service, configure a SAP and an SDP for each far-end node.
The following is a sample configuration output of a local VPLS service on ALA-1.
The following is a sample configuration output of a distributed VPLS service between ALA-1, ALA-2, and ALA-3.
4.5.2. Common Configuration Tasks
This section provides a brief overview of the tasks that must be performed to configure both local VPLS services and provides the CLI commands.
For VPLS services:
- Associate VPLS service with a customer ID
- Define SAPs:
- Select nodes and ports
- Optional — Select QoS policies other than the default (configured in config>qos context)
- Optional — Select filter policies (configured in config>filter context)
- Optional — Select accounting policy (configured in config>log context)
- Modify STP default parameters (optional) (see VPLS and Spanning Tree Protocol)
- Enable service
4.5.3. Configuring VPLS Components
4.5.3.1. Creating a VPLS Service
Use the following syntax to create a VPLS service.
The following is a sample VPLS configuration output.
4.5.3.1.1. Enabling MAC Move
The mac-move feature is useful to protect against undetected loops in your VPLS topology as well as the presence of duplicate MACs in a VPLS service. For example, if two clients in the VPLS have the same MAC address, the VPLS will experience a high relearn rate for the MAC and will shut down the SAP when the threshold is exceeded.
Use the following syntax to configure mac-move parameters.
The following is a sample of mac-move information.
4.5.3.1.2. Configuring STP Bridge Parameters in a VPLS
Modifying some of the Spanning Tree Protocol parameters allows the operator to balance STP between resiliency and speed of convergence extremes. Modifying particular parameters, mentioned as follows, must be done in the constraints of the following two formulae:
2 x (Bridge_Forward_Delay - 1.0 seconds) >= Bridge_Max_Age Bridge_Max_Age >= 2 x (Bridge_Hello0_Time + 1.0 seconds)
STP always uses the locally configured values for the first three parameters (Admin State, Mode and Priority).
For the parameters Max Age, Forward Delay, Hello Time and Hold Count, the locally configured values are only used when this bridge has been elected root bridge in the STP domain, otherwise the values received from the root bridge are used. The exception to this rule is: when STP is running in RSTP mode, the Hello Time is always taken from the locally configured parameter. The other parameters are only used when running mode MSTP.
4.5.3.1.2.1. Bridge STP Admin State
The administrative state of STP at the VPLS level is controlled by the shutdown command.
When STP on the VPLS is administratively disabled, any BPDUs are forwarded transparently through the 7210 SAS-R6 and 7210 SAS-R12. When STP on the VPLS is administratively enabled, but the administrative state of a SAP is down, BPDUs received on such a SAP are discarded.
4.5.3.1.2.2. Mode
To be compatible with the different iterations of the IEEE 802.1D standard, the 7210 SAS-R6 and 7210 SAS-R12 support several variants of the Spanning Tree protocol:
- rstpRapid Spanning Tree Protocol (RSTP) compliant with IEEE 802.1D-2004 - default mode
- dot1wcompliant with IEEE 802.1w
- comp-dot1woperation as in RSTP but backwards compatible with IEEE 802.1w (this mode was introduced for interoperability with some MTU types)
- mstpcompliant with the Multiple Spanning Tree Protocol specified in IEEE 802.1Q REV/D5.0-09/2005. This mode of operation is only supported in an mVPLS.
- pmstpcompliant with the Multiple Spanning Tree Protocol specified in IEEE 802.1Q REV/D3.0-04/2005 but with some changes to make it backwards compatible to 802.1Q 2003 edition and IEEE 802.1w
See section Spanning Tree Operating Modes for details on these modes.
Default: rstp
4.5.3.1.2.3. Bridge Priority
The bridge-priority command is used to populate the priority portion of the bridge ID field within outbound BPDUs (the most significant 4 bits of the bridge ID). It is also used as part of the decision process when determining the best BPDU between messages received and sent.
All values will be truncated to multiples of 4096, conforming with IEEE 802.1t and 802.1D-2004.
Range: 1 to 65535
Default: 32768
Restore Default: no priority
4.5.3.1.2.4. Max Age
The max-age command indicates how many hops a BPDU can traverse the network starting from the root bridge. The message age field in a BPDU transmitted by the root bridge is initialized to 0. Each other bridge will take the message_age value from BPDUs received on their root port and increment this value by 1. The message_age therefore reflects the distance from the root bridge. BPDUs with a message age exceeding max-age are ignored.
STP uses the max-age value configured in the root bridge. This value is propagated to the other bridges by the BPDUs. The default value of max-age is 20. This parameter can be modified within a range of 6 to 40, limited by the standard STP parameter interaction formulae.
Range: 6 to 40 seconds
Default: 20 seconds
Restore Default: no max-age
4.5.3.1.2.5. Forward Delay
RSTP, as defined in the IEEE 802.1D-2004 standards, will transition to the forwarding state by a handshaking mechanism (rapid transition), without any waiting times. If handshaking fails (e.g. on shared links, as follows), the system falls back to the timer-based mechanism defined in the original STP (802.1D-1998) standard.
A shared link is a link with more than two Ethernet bridges (for example, a shared 10/100BaseT segment). The port-type command is used to configure a link as point-to-point or shared (see section SAP Link Type).
For timer-based transitions, the 802.1D-2004 standard defines an internal variable forward-delay, which is used in calculating the default number of seconds that a SAP spends in the discarding and learning states when transitioning to the forwarding state. The value of the forward-delay variable depends on the STP operating mode of the VPLS instance:
- in rstp mode, but only when the SAP has not fallen back to legacy STP operation, the value configured by the hello-time command is used;
- in all other situations, the value configured by the forward-delay command is used.config>service>vpls service-id# stpforward-delay seconds
Range: 4 to 30 seconds
Default: 15 seconds
Restore Default: no forward-delay
4.5.3.1.2.6. Hello Time
The hello-time command configures the Spanning Tree Protocol (STP) hello time for the Virtual Private LAN Service (VPLS) STP instance.
The seconds parameter defines the default timer value that controls the sending interval between BPDU configuration messages by this bridge, on ports where this bridge assumes the designated role.
The active hello time for the spanning tree is determined by the root bridge (except when the STP is running in RSTP mode, then the hello time is always taken from the locally configured parameter).
The configured hello-time value can also be used to calculate the bridge forward delay, see Forward Delay.
Range: 1 to 10 seconds
Default: 2 seconds
Restore Default: no hello-time
4.5.3.1.2.7. Hold Count
The hold-count command configures the peak number of BPDUs that can be transmitted in a period of one second.
Range: 1 to 10
Default: 6
Restore Default: no hold-count
4.5.3.1.2.8. MST Instances
You can create up to 15 MST-instances. They can range from 1 to 4094. By changing path-cost and priorities, you can make sure that each instance will form it's own tree within the region, therefore making sure different VLANs follow different paths.
You can assign non overlapping VLAN ranges to each instance. VLANs that are not assigned to an instance are implicitly assumed to be in instance 0, which is also called the CIST. This CIST cannot be deleted or created.
The parameter that can be defined per instance are mst-priority and vlan-range.
- mst-priority — The bridge-priority for this specific mst-instance. It follows the same rules as bridge-priority. For the CIST, the bridge-priority is used.
- vlan-range — The VLANs are mapped to this specific mst-instance. If no VLAN-ranges are defined in any mst-instances, then all VLANs are mapped to the CIST.
4.5.3.1.2.9. MST Max Hops
The mst-max-hops command defines the maximum number of hops the BPDU can traverse inside the region. Outside the region max-age is used.
4.5.3.1.2.10. MST Name
The MST name defines the name that the operator gives to a region. Together with MST revision and the VLAN to MST-instance mapping, it forms the MST configuration identifier. Two bridges that have the same MST configuration identifier form a region if they exchange BPDUs.
4.5.3.1.2.11. MST Revision
The MST revision together with MST-name and VLAN to MST-instance mapping define the MST configuration identifier. Two bridges that have the same MST configuration identifier form a region if they exchange BPDUs.
4.5.3.2. Configuring a VPLS SAP
A default QoS policy is applied to each ingress SAP. Additional QoS policies can be configured in the config>qos context. There are no default filter policies. Filter policies are configured in the config>filter context and must be explicitly applied to a SAP.
4.5.3.2.1. Local VPLS SAPs
To configure a local VPLS service, enter the sap sap-id command twice with different port IDs in the same service configuration.
The following is a sample local VPLS configuration output.
4.5.3.2.2. Distributed VPLS SAPs
To configure a distributed VPLS service, you must configure service entities on originating and far-end nodes. You must use the same service ID on all ends (for example, create a VPLS service ID 9000 on ALA-1, ALA-2, and ALA-3). A distributed VPLS consists of a SAP on each participating node and an SDP bound to each participating node.
For SDP configuration information, see Configuring an SDP. For SDP binding information, see Configuring SDP Bindings.
The following is a sample VPLS SAPs configuration output.
4.5.3.2.3. Configuring SAP-Specific STP Parameters
When a VPLS has STP enabled, each SAP within the VPLS has STP enabled by default.
4.5.3.2.3.1. SAP STP Administrative State
The administrative state of STP within a SAP controls how BPDUs are transmitted and handled when received. The allowable states are:
- SAP Admin Up
- The default administrative state is up for STP on a SAP. BPDUs are handled in the normal STP manner on a SAP that is administratively up.
- SAP Admin Down
- An administratively down state allows a service provider to prevent a SAP from becoming operationally blocked. BPDUs will not originate out the SAP toward the customer.
- If STP is enabled on VPLS level, but disabled on the SAP, received BPDUs are discarded. Discarding the incoming BPDUs allows STP to continue to operate within the VPLS service while ignoring the down SAP. The specified SAP will always be in an operationally forwarding state.
- NOTE: The administratively down state allows a loop to form within the VPLS.
Range: shutdown or no shutdown
Default: no shutdown (SAP admin up)
4.5.3.2.3.2. SAP Virtual Port Number
The virtual port number uniquely identifies a SAP within configuration BPDUs. The internal representation of a SAP is unique to a system and has a reference space much bigger than the 12 bits definable in a configuration BPDU. STP takes the internal representation value of a SAP and identifies it with it’s own virtual port number that is unique to every other SAP defined on the VPLS. The virtual port number is assigned at the time that the SAP is added to the VPLS.
Since the order in which SAPs are added to the VPLS is not preserved between reboots of the system, the virtual port number may change between restarts of the STP instance. To achieve consistency after a reboot, the virtual port number can be specified explicitly.
Range: 1 — 2047
Default: (automatically generated)
Restore Default: no port-num
4.5.3.2.3.3. SAP Priority
SAP priority allows a configurable “tie breaking” parameter to be associated with a SAP. When configuration BPDUs are being received, the configured SAP priority will be used in some circumstances to determine whether a SAP will be designated or blocked.
In traditional STP implementations (802.1D-1998), this field is called the port priority and has a value of 0 to 255. This field is coupled with the port number (0 to 255 also) to create a 16 bit value. In the latest STP standard (802.1D-2004) only the upper 4 bits of the port priority field are used to encode the SAP priority. The remaining 4 bits are used to extend the port ID field into a 12 bit virtual port number field. The virtual port number uniquely references a SAP within the STP instance. See SAP Virtual Port Number for details on the virtual port number.
STP computes the actual SAP priority by taking the configured priority value and masking out the lower four bits. The result is the value that is stored in the SAP priority parameter. For example, if a value of 0 was entered, masking out the lower 4 bits would result in a parameter value of 0. If a value of 255 was entered, the result would be 240.
The default value for SAP priority is 128. This parameter can be modified within a range of 0 to 255, 0 being the highest priority. Masking causes the values actually stored and displayed to be 0 to 240, in increments of 16.
Range: 0 to 255 (240 largest value, in increments of 16)
Default: 128
Restore Default: no priority
4.5.3.2.3.4. SAP Path Cost
The SAP path cost is used by STP to calculate the path cost to the root bridge. The path cost in BPDUs received on the root port is incremental with the configured path cost for that SAP. When BPDUs are sent out other egress SAPs, the newly calculated root path cost is used.
STP suggests that the path cost is defined as a function of the link bandwidth. Since SAPs are controlled by complex queuing dynamics, in the the STP path cost is a purely static configuration.
The default value for SAP path cost is 10. This parameter can be modified within a range of 1 to 65535, 1 being the lowest cost.
Range: 1 to 200000000
Default: 10
Restore Default: no path-cost
4.5.3.2.3.5. SAP Edge Port
The SAP edge-port command is used to reduce the time it takes a SAP to reach the forwarding state when the SAP is on the edge of the network, and therefore has no further STP bridge to handshake with.
The edge-port command is used to initialize the internal OPER_EDGE variable. At any time, when OPER_EDGE is false on a SAP, the normal mechanisms are used to transition to the forwarding state (see Forward Delay). When OPER_EDGE is true, STP assumes that the remote end agrees to transition to the forwarding state without actually receiving a BPDU with an agreement flag set.
The OPER_EDGE variable will dynamically be set to false if the SAP receives BPDUs (the configured edge-port value does not change). The OPER_EDGE variable will dynamically be set to true if auto-edge is enabled and STP concludes there is no bridge behind the SAP.
When STP on the SAP is administratively disabled and re-enabled, the OPER_EDGE is reinitialized to the value configured for edge-port.
Valid values for SAP edge-port are enabled and disabled with disabled being the default.
Default: no edge-port
4.5.3.2.3.6. SAP Auto Edge
The SAP edge-port command is used to instruct STP to dynamically decide whether the SAP is connected to another bridge.
If auto-edge is enabled, and STP concludes there is no bridge behind the SAP, the OPER_EDGE variable will dynamically be set to true. If auto-edge is enabled, and a BPDU is received, the OPER_EDGE variable will dynamically be set to true (see SAP Edge Port).
Valid values for SAP auto-edge are enabled and disabled with enabled being the default.
Default: auto-edge
4.5.3.2.3.7. SAP Link Type
The SAP link-type parameter instructs STP on the maximum number of bridges behind this SAP. If there is only a single bridge, transitioning to forwarding state will be based on handshaking (fast transitions). If more than two bridges are connected by a shared media, their SAPs should all be configured as shared, and timer-based transitions are used.
Valid values for SAP link-type are shared and pt-pt with pt-pt being the default.
Default: link-type pt-pt
Restore Default: no link-type
4.5.3.2.3.8. MST Instances
The SAP mst-instance command is used to create MST instances at the SAP level. MST instance at a SAP level can be created only if MST instances are defined at the service level.
The parameters that can be defined per instance are mst-path-cost and mst-port-priority.
- mst-path-cost — Specifies path-cost within a specific MST instance. The path-cost is proportional to link speed.
- mst-port-priority — Specifies the port priority within a specific MST instance.
4.5.3.2.4. STP SAP Operational States
The operational state of STP within a SAP controls how BPDUs are transmitted and handled when received.
4.5.3.2.4.1. Operationally Disabled
Operationally disabled is the normal operational state for STP on a SAP in a VPLS that has any of the following conditions:
- VPLS state administratively down
- SAP state administratively down
- SAP state operationally down
If the SAP enters the operationally up state with the STP administratively up and the SAP STP state is up, the SAP will transition to the STP SAP discarding state.
When, during normal operation, the router detects a downstream loop behind a SAP, BPDUs can be received at a very high rate. To recover from this situation, STP will transition the SAP to disabled state for the configured forward-delay duration.
4.5.3.2.4.2. Operationally Discarding
A SAP in the discarding state only receives and sends BPDUs, building the local correct STP state for each SAP while not forwarding actual user traffic. The duration of the discarding state is explained in section Forward Delay.
| Note: In previous versions of the STP standard, the discarding state was called a blocked state. |
4.5.3.2.4.3. Operationally Learning
The learning state allows population of the MAC forwarding table before entering the forwarding state. In this state, no user traffic is forwarded.
4.5.3.2.4.4. Operationally Forwarding
Configuration BPDUs are sent out a SAP in the forwarding state. Layer 2 frames received on the SAP are source learned and destination forwarded according to the FIB. Layer 2 frames received on other forwarding interfaces and destined for the SAP are also forwarded.
4.5.3.2.4.5. SAP BPDU Encapsulation State
IEEE 802.1d (referred as dot1d) and Cisco per-VLAN Spanning Tree (PVST) BPDU encapsulations are supported on a per SAP basis. The STP is associated with a VPLS service like PVST is per VLAN. The difference between the two encapsulations is in the Ethernet and LLC framing and a type-length-value (TLV) field trailing the BPDU.The encapsulation format cannot be configured by the user; the system automatically determines the encapsulation format based on the BPDUs received on the port.
Table 43 shows differences between Dot1d and PVST Ethernet BPDU encapsulations based on the interface encap-type field:
Table 43: SAP BPDU Encapsulation States
Field | dot1d encap-type null | dot1d encap-type dot1q | PVST encap-type null | PVST encap-type dot1q |
Destination MAC | 01:80:c2:00:00:00 | 01:80:c2:00:00:00 | N/A | 01:00:0c:cc:cc:cd |
Source MAC | Sending Port MAC | Sending Port MAC | N/A | Sending Port MAC |
EtherType | N/A | 0x81 00 | N/A | 0x81 00 |
Dot1p and CFI | N/A | 0xe | N/A | 0xe |
Dot1q | N/A | VPLS SAP ID | N/A | VPLS SAP encap value |
Length | LLC Length | LLC Length | N/A | LLC Length |
LLC DSAP SSAP | 0x4242 | 0x4242 | N/A | 0xaaaa (SNAP) |
LLC CNTL | 0x03 | 0x03 | N/A | 0x03 |
SNAP OUI | N/A | N/A | N/A | 00 00 0c (Cisco OUI) |
SNAP PID | N/A | N/A | N/A | 01 0b |
CONFIG | Standard 802.1d | Standard 802.1d | N/A | Standard 802.1d |
TLV: Type & Len | N/A | N/A | N/A | 58 00 00 00 02 |
TLV: VLAN | N/A | N/A | N/A | VPLS SAP encap value |
Padding | As Required | As Required | N/A | As Required |
Each SAP has a Read-Only operational state that shows which BPDU encapsulation is currently active on the SAP. The states are:
- Dot1d — This state specifies that the switch is currently sending IEEE 802.1d standard BPDUs. The BPDUs are tagged or non-tagged based on the encapsulation type of the egress interface and the encapsulation value defined in the SAP. A SAP defined on an interface with encapsulation type dot1q continues in the dot1d BPDU encapsulation state until a PVST encapsulated BPDU is received In which case, the SAP will convert to the PVST encapsulation state. Each received BPDU must be properly IEEE 802.1q tagged if the interface encapsulation type is defined as dot1q. PVST BPDUs will be silently discarded if received when the SAP is on an interface defined with encapsulation type null.
- PVST — This state specifies that the switch is currently sending proprietary encapsulated BPDUs. PVST BPDUs are only supported on Ethernet interfaces with the encapsulation type set to dot1q. The SAP continues in the PVST BPDU encapsulation state until a dot1d encapsulated BPDU is received, in which case, the SAP reverts to the dot1d encapsulation state. Each received BPDU must be properly IEEE 802.1q tagged with the encapsulation value defined for the SAP. PVST BPDUs are silently discarded if received when the SAP is on an interface defined with a null encapsulation type.
Dot1d is the initial and only SAP BPDU encapsulation state for SAPs defined on Ethernet interface with encapsulation type set to null.
4.5.3.2.5. Configuring VPLS SAPs with per service Split Horizon
To configure a VPLS service with a split horizon group, add the split-horizon-group parameter when creating the SAP. Traffic arriving on a SAP within a split horizon group will not be copied to other SAPs in the same split horizon group.
The following is a sample VPLS configuration output with split horizon enabled.
4.5.3.3. Configuring SDP Bindings
VPLS provides scaling and operational advantages. A hierarchical configuration eliminates the need for a full mesh of VCs between participating devices. Hierarchy is achieved by enhancing the base VPLS core mesh of VCs with access VCs (spoke) to form two tiers. Spoke SDPs are generally created between Layer 2 switches and placed at the Multi-Tenant Unit (MTU). The PE routers are placed at the service provider's Point of Presence (POP). Signaling and replication overhead on all devices is considerably reduced.
A spoke-SDP is treated like the equivalent of a traditional bridge port where flooded traffic received on the spoke-SDP is replicated on all other “ports” (other spoke SDPs or SAPs) and not transmitted on the port it was received (unless a split horizon group was defined on the spoke-SDP, see section Configuring VPLS Spoke SDPs with Split Horizon).
A spoke-SDP connects a VPLS service between two sites and, in its simplest form, could be a single tunnel LSP. A set of ingress and egress VC labels are exchanged for each VPLS service instance to be transported over this LSP. The PE routers at each end treat this as a virtual spoke connection for the VPLS service in the same way as the PE-MTU connections. This architecture minimizes the signaling overhead and avoids a full mesh of VCs and LSPs between the two metro networks.
A VC-ID can be specified with the SDP-ID. The VC-ID is used instead of a label to identify a virtual circuit. The VC-ID is significant between peer SRs on the same hierarchical level. The value of a VC-ID is conceptually independent from the value of the label or any other datalink specific information of the VC.
4.5.3.3.1. Configuring VPLS Spoke SDPs with Split Horizon
To configure spoke SDPs with a split horizon group, add the split-horizon-group parameter when creating the spoke-SDP. Traffic arriving on a SAP or spoke-SDP within a split horizon group will not be copied to other SAPs or spoke SDPs in the same split horizon group.
The following is a sample VPLS configuration output with split horizon enabled.
4.5.4. Configuring VPLS Redundancy
This section describes the service management tasks.
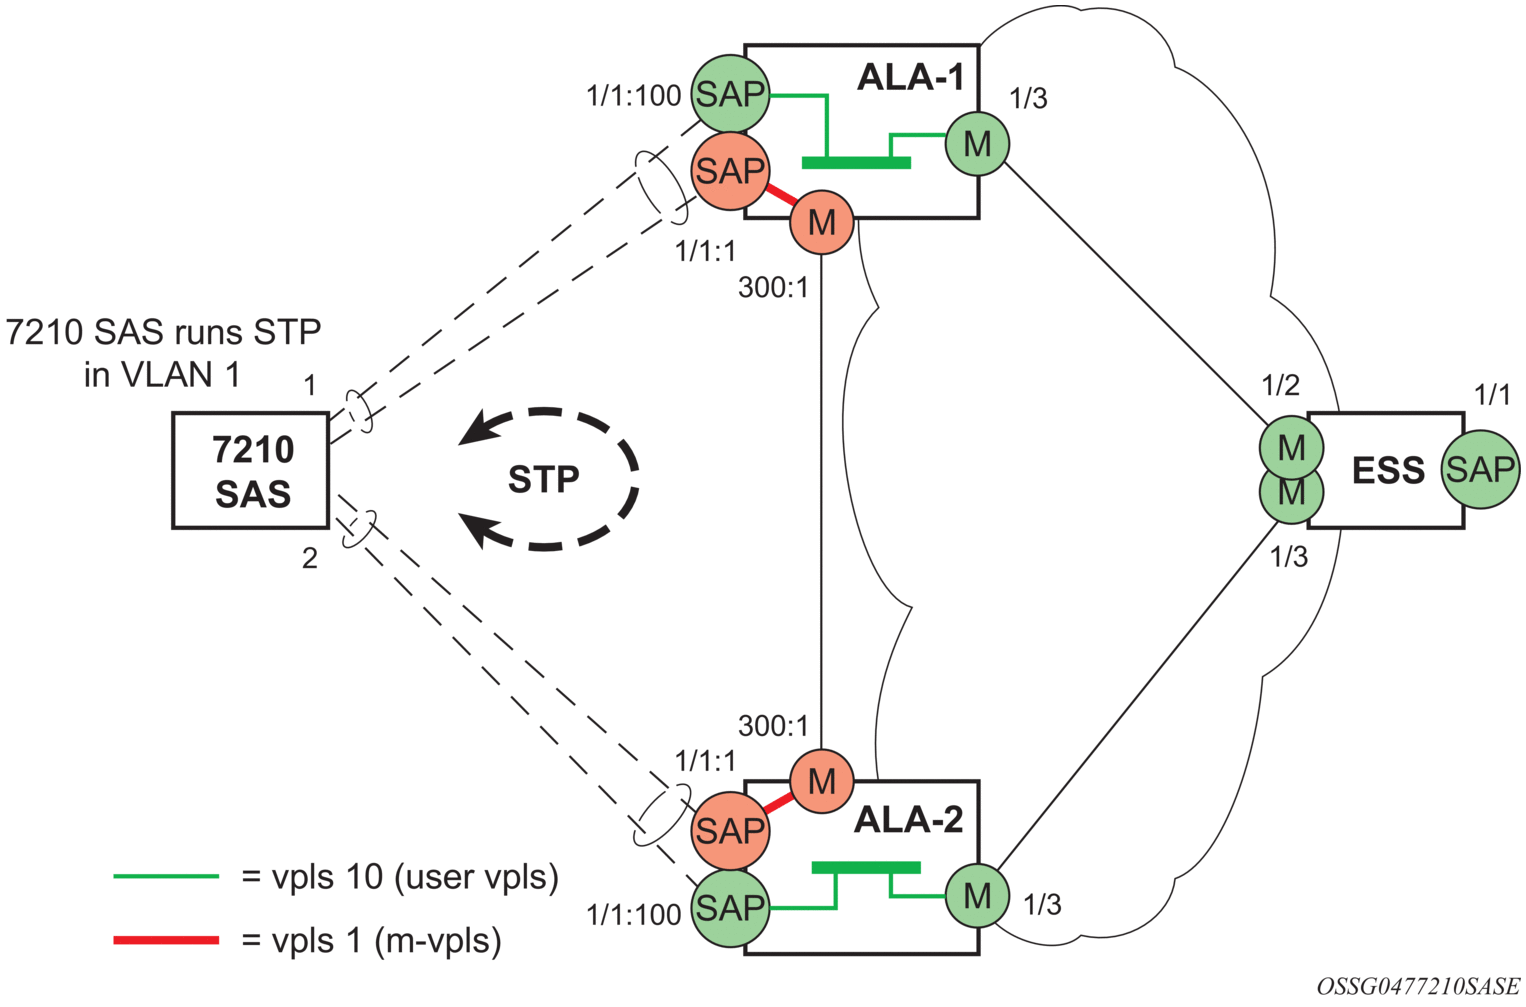
4.5.4.1. Creating a Management VPLS for SAP Protection
This section provides a brief overview of the tasks that must be performed to configure a management VPLS for SAP protection and provides the CLI commands, see Figure 47. The following tasks should be performed on both nodes providing the protected VPLS service.
Before configuring a management VPLS, first read VPLS Redundancy for an introduction to the concept of management VPLS and SAP redundancy.
- Create an SDP to the peer node.
- Create a management VPLS.
- Define a SAP in the m-vpls on the port. Note that the port must be dot1q. The SAP corresponds to the (stacked) VLAN on the 7210 SAS-R6 and 7210 SAS-R12 in which STP is active.
- Optionally modify STP parameters for load balancing (see Configuring Load Balancing with Management VPLS).
- Create an SDP in the m-vpls using the SDP defined in Step 1. Ensure that this SDP runs over a protected LSP.
- Enable the management VPLS service and verify that it is operationally up.
- Create a list of VLANs on the port that are to be managed by this management VPLS.
- Create one or more user VPLS services with SAPs on VLANs in the range defined by Step 6.
Figure 47: Example Configuration for Protected VPLS SAP
The following is a sample VPLS configuration output.
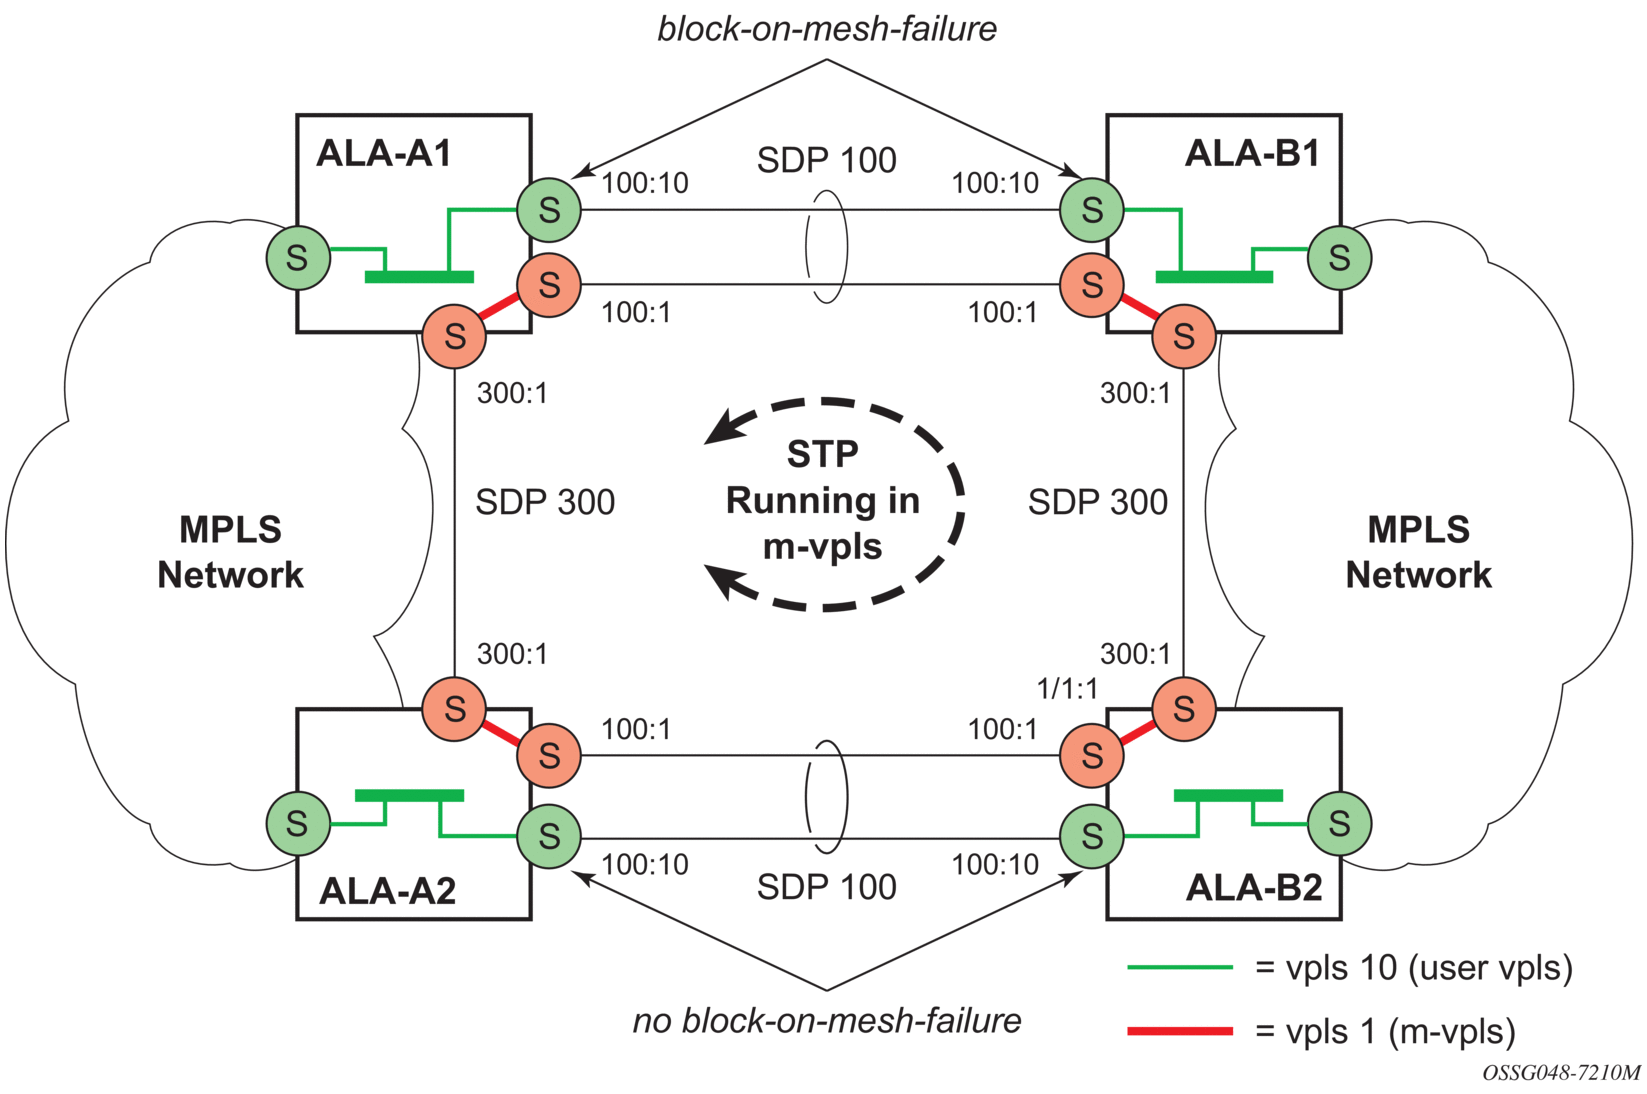
4.5.4.2. Creating a Management VPLS for Spoke-SDP Protection
This section provides a brief overview of the tasks that must be performed to configure a management VPLS for spoke-SDP protection and provides the CLI commands, see Figure 48. The following tasks should be performed on all four nodes providing the protected VPLS service.
Before configuring a management VPLS, please first read Configuring a VPLS SAP for an introduction to the concept of management VPLS and spoke-SDP redundancy.
- Create an SDP to the local peer node (node ALA-A2 in the following example).
- Create an SDP to the remote peer node (node ALA-B1 in the following example).
- Create a management VPLS.
- Create a spoke-SDP in the m-vpls using the SDP defined in Step 1. Ensure that this mesh spoke-SDP runs over a protected LSP (see following note).
- Enable the management VPLS service and verify that it is operationally up.
- Create a spoke-SDP in the m-vpls using the SDP defined in Step 2. Optionally, modify STP parameters for load balancing.
- Create one or more user VPLS services with spoke SDPs on the tunnel SDP defined by Step 2.
As long as the user spoke SDPs created in step 7are in this same tunnel SDP with the management spoke-SDP created in step 6, the management VPLS will protect them.
Figure 48: Example Configuration for Protected VPLS Spoke-SDP
Use the following CLI syntax to create a management VPLS for spoke-SDP protection:
The following is a sample VPLS configuration output.
4.5.4.3. Configuring a BGP-Auto-Discovery
BGP-AD automatically creates SDP-bindings using a template to configure SDP-binding configuration parameters. L2-auto-bind is a command used to initiate a template that is used by BGP-AD for PW instantiation under related VPLS instances.
The template may be referenced in the “service vpls bgp-ad” object and used subsequently to instantiate PWs to a remote PE and VSI instance advertised through BGP Auto-Discovery. Changes to these dynamically created objects cannot be performed directly through CLI or SNMP. There are two possible methods to initiate the change:
- Configure a new “l2-auto-bind” association under service>vpls>bgp-ad. This method is used when the existing policy is used by multiple VPLS services and only one or a few require the change.
- Change the parameters of the current template. This method is used when a change in parameter is required for the majority of VPLS services that use the template.
Changes are not automatically propagated to the instantiated objects and must be done through one of two tool commands:
This command forces evaluation of changes that were made in the l2-auto-bind template indicated in the command. This command can be applied to an individual VPLS service or all VPLS services that reference the template if no service is specified.
The parameters are divided into three classes.
- Class 1: Modified at create time only.
- Class 2: Modified only when the object is administratively shutdown.
- Class 3: No restrictions.
Parameters that fall into class 1 will destroy existing objects and recreate objects with the new values. Parameters in class 2 will momentarily shutdown the object, change the parameter, then re-enable the object. Class 3 can be changed without affecting the operational status of the objects of service.
For the l2-auto-bind template, the parameters are treated as follows:
- Class 1: Adding or removing a split-horizon-group, switching between a manual and auto SDP
- Class 2: Changing the vc-type {ether|vlan}
- Class 3: All other changes.
The keyword allow-service-impact enables service impacting changes. If this keyword is not configured, an error message is generated if the parameter changes are service impacting.
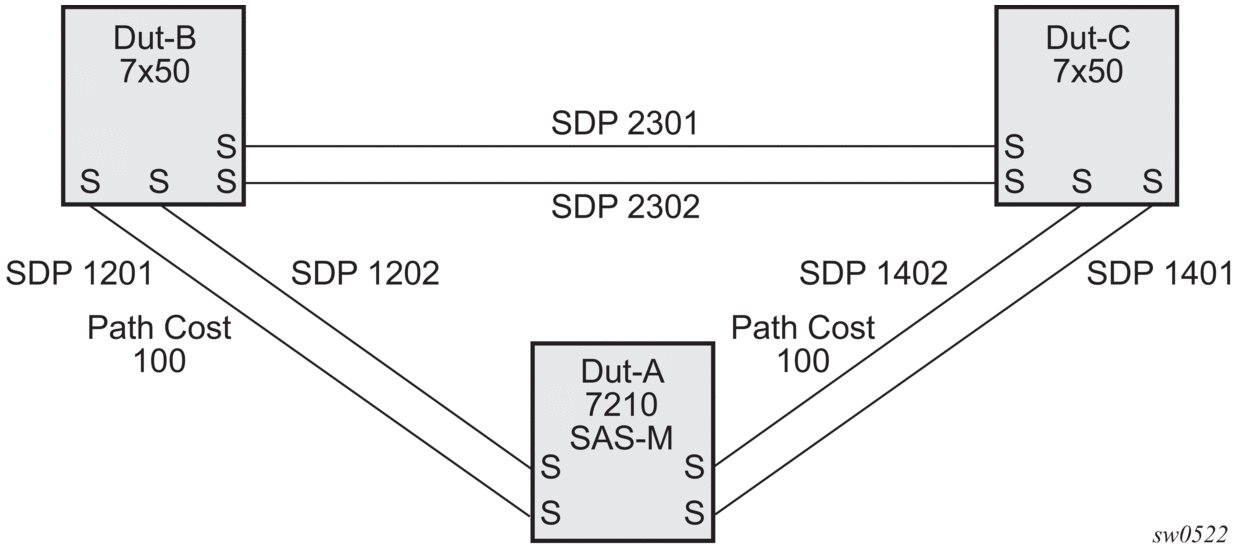
4.5.4.4. Configuring Load Balancing with Management VPLS
With the concept of management VPLS, it is possible to load balance the user VPLS services across the two protecting nodes. This is done by creating two management VPLS instances, where both instances have different active spokes (by changing the STP path-cost). When different user VPLS services are associated with either the two management VPLS services, the traffic will be split across the two spokes.
Load balancing can be achieved in both the SAP protection and spoke-SDP protection scenarios. Figure 49 shows an example with the following configuration.
- Dut-C — spoke-SDPmvpls 100MVPLS M1Dut-A — Spoke SDP 1201:100 (STP blocked); 1401:100Dut-B — Spoke SDP 1201:100; 2301:100
- Dut-C — Spoke-SDP 1401:100; 2301:100uvpls 101UVPLS U1Dut-A — Spoke SDP 1201:101; 1401:101Dut-B — Spoke SDP 1201:101; 2301:101
- Dut-C — Spoke-SDP 1401:101; 2301:101mvpls 200MVPLSM2Dut-A — Spoke SDP 1202:200; 1402:200 (STP blocked)Dut-B — Spoke SDP 1202:200; 2302:200
- Dut-C — Spoke-SDP 1402:200; 2302:200uvpls 201UVPLS U2Dut-A — Spoke SDP 1202:201; 1402:201Dut-B — Spoke SDP 1202:201; 2302:201Dut-C — Spoke SDP 1402:201; 2302:201
Figure 49: Example Configuration for Load balancing Across Two Protected VPLS Spoke SDPs
Use the following syntax to create a load balancing across two management VPLS instances:
This following outputs shows sample configurations for load balancing across two protected VPLS spoke SDPs:
The configuration on ALA-B (7210), the top left node is shown as follows. It is configured such that it becomes the root bridge for MVPLS 100 and MVPLS 200.
The configuration on ALA-C (7210), the top right node is shown as follows.
4.5.4.5. Configuring Selective MAC Flush
Use the following syntax to enable selective MAC Flush in a VPLS.
Use the following syntax to disable selective MAC Flush in a VPLS.
4.5.5. Configuring IGMPv3 Snooping in RVPLS
IGMPv3 snooping in RVPLS is supported only for IES (not for VPRNs).
Use the following syntax to configure IGMPv3 snooping in routed VPLS bound to an IES.
The following is a sample RVPLS configuration output that uses IGMPv3 snooping.
4.5.6. Configuring BGP Auto-Discovery
This section provides important information to describe the different configuration options used to populate the required BGP AD and generate the LDP generalized pseudowire-ID FEC fields. There are a large number of configuration options that are available with the this feature. Not all these configurations option are required to start using BGP AD. At the end of this section, it will be apparent that a very simple configuration will automatically generate the required values used by BGP and LDP. In most cases, deployments will provide full mesh connectivity between all nodes across a VPLS instance. However, capabilities are available to influence the topology and build hierarchies or hub and spoke models.
4.5.6.1. Configuration Steps
Using Figure 50, assume PE6 was previously configured with VPLS 100 as indicated by the configurations lines in the upper right. The BGP AD process will commence after PE134 is configured with the VPLS 100 instance as shown in the upper left. This shows a very basic and simple BGP AD configuration. The minimum requirement for enabling BGP AD on a VPLS instance is configuring the VPLS-ID and point to a pseudowire template.
Figure 50: BGP AD Configuration Example
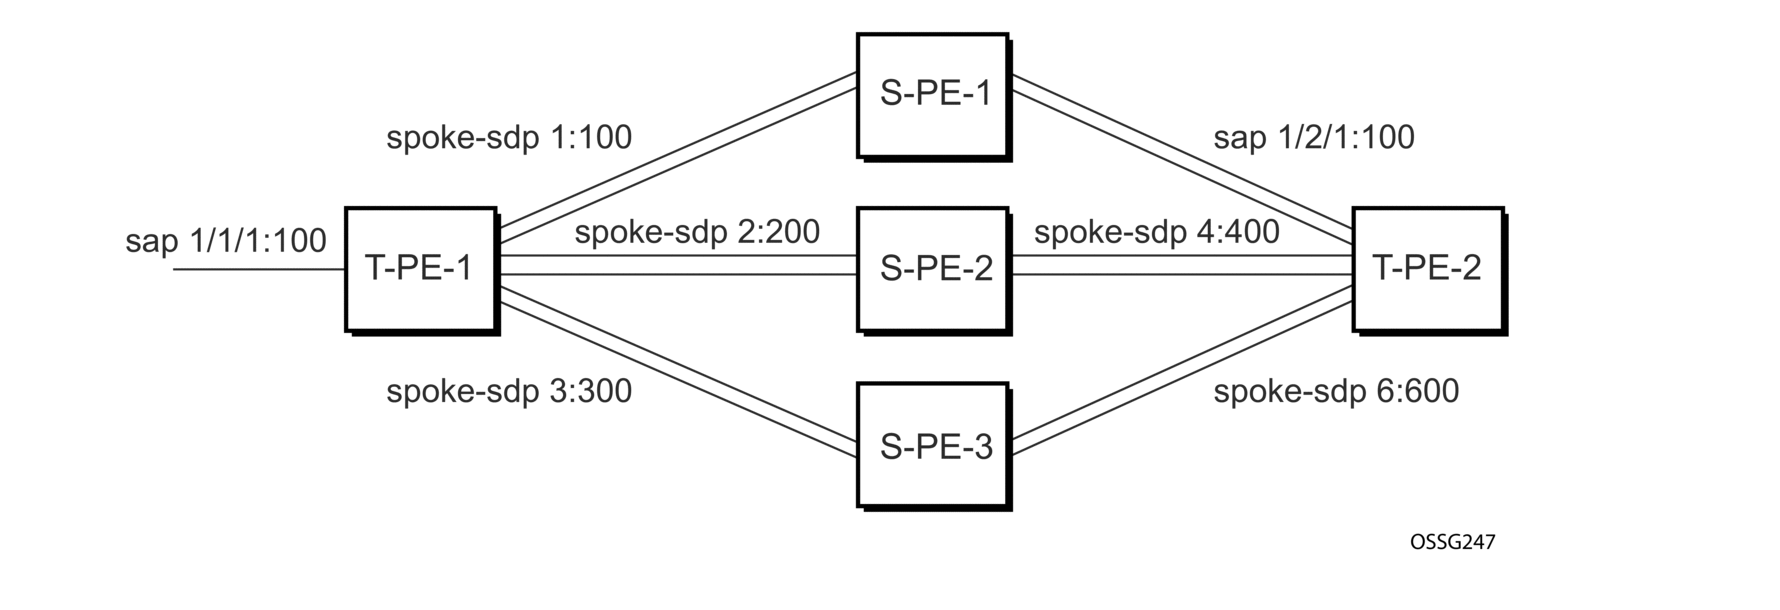
In many cases, VPLS connectivity is based on a pseudowire mesh. To reduce the configuration requirement, the BGP values can be automatically generated using the VPLS-ID and the MPLS router-ID. By default, the lower six bytes of the VPLS-ID are used to generate the RD and the RT values. The VSI-ID value is generated from the MPLS router-ID. All of these parameters are configurable and can be coded to suit requirements and build different topologies
A helpful command displays the service information, the BGP parameters and the SDP bindings in use. When the discovery process is completed successfully each endpoint will have an entry for the service.
When only one of the endpoints has an entry for the service in the l2-routing-table, it is most likely a problem with the RT values used for import and export. This would most likely happen when different import and export RT values are configured using a router policy or the route-target command.
Service-specific commands continue to be available to display service-specific information, including status.
BGP AD advertises the VPLS-ID in the extended community attribute, VSI-ID in the NLRI and the local PE ID in the BGP next hop. At the receiving PE, the VPLS-ID is compared against locally provisioned information to determine whether the two PEs share a common VPLS. If it is found that they do, the BGP information is used in the signaling phase.
4.5.7. Configuring AS Pseudo-wire in VPLS
Figure 51: Sample Topology-AS Pseudo-wire in VPLS
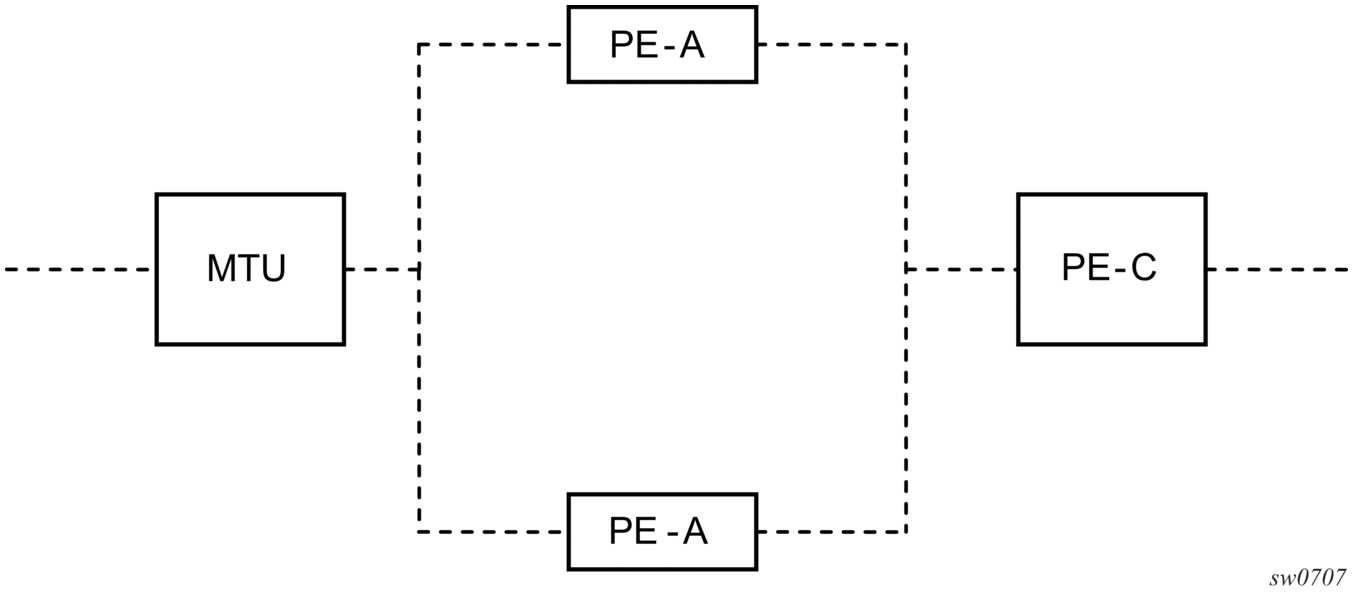
In Figure 51, Pseudo-wire is configured on MTU. The following is a sample configuration output on the MTU.
4.6. Service Management Tasks
4.6.1. Modifying VPLS Service Parameters
You can change existing service parameters. The changes are applied immediately. To display a list of services, use the show>service>service-using vpls command. Enter the parameter such as description SAP and then enter the new information.
The following is a sample modified VPLS configuration output.
4.6.2. Modifying Management VPLS Parameters
To modify the range of VLANs on an access port that are to be managed by an existing management VPLS, first the new range should be entered and afterwards the old range removed. If the old range is removed before a new range is defined, all customer VPLS services in the old range will become unprotected and may be disabled.
4.6.3. Deleting a Management VPLS
As with normal VPLS service, a management VPLS cannot be deleted until SAPs and SDPs are unbound (deleted), interfaces are shutdown, and the service is shutdown on the service level.
Use the following syntax to delete a management VPLS service.
4.6.4. Disabling a Management VPLS
You can shut down a management VPLS without deleting the service parameters.
When a management VPLS is disabled, all associated user VPLS services are also disabled (to prevent loops). If this is not desired, first unmanage the user VPLS service by removing them from the managed-vlan-list.
Example: config>service# vpls 1 config>service>vpls# shutdown config>service>vpls# exit
4.6.5. Deleting a VPLS Service
A VPLS service cannot be deleted until SAPs and SDPs are unbound (deleted), interfaces are shutdown, and the service is shutdown on the service level.
Use the following syntax to delete a VPLS service.
4.6.6. Disabling a VPLS Service
Use the following syntax to shut down a VPLS service without deleting the service parameters.
Example: config>service# vpls 1 config>service>vpls# shutdown config>service>vpls# exit
4.6.7. Re-Enabling a VPLS Service
Use the following syntax to re-enable a VPLS service that was shut down.
Example: config>service# vpls 1 config>service>vpls# no shutdown config>service>vpls# exit