System Initialization

Depending on the chassis, the primary copy of 7705 SAR software is located either on a removable compact flash card that is shipped with the 7705 SAR router or in the router on-board flash memory. The compact flash (cf3) contains a copy of the 7705 SAR image, the bootstrap file (boot.ldr), and the boot options file (BOF). The compact flash can also be used to store configurations and executable images. These configurations and images can also be stored at an FTP file location.

The following chassis have removable compact flash cards:

All other chassis have integrated memory that cannot be removed.

Note: In most cases you must have a console connection to access the node when there is no network connectivity to the node. Some commands can be given to the node through the ACO/LT button before there is network connectivity. See Automatic Discovery Protocol. Also see the appropriate chassis installation guide, ‟Automatic Discovery Protocol”.

Starting a 7705 SAR begins with hardware initialization (a reset or power cycle). By default, the system searches the compact flash (cf3) for the boot.ldr file (also known as the boot loader or bootstrap file). The boot.ldr file is the image that reads and executes the system initialization commands configured in the BOF. The default value to initially search for the boot.ldr file on cf3 cannot be modified.

If the system cannot load or cannot find the boot.ldr file on the compact flash memory device (cf3), the system reboots continuously in an attempt to successfully find and load the file. If this happens, the available options depend on the chassis.

For the 7705 SAR-8 Shelf V2 and 7705 SAR-18, there are two options:

For the 7705 SAR-M, there are two options:

For the 7705 SAR-H, there are one or two options:

For the 7705 SAR-A, 7705 SAR-Ax, 7705 SAR-Hc, 7705 SAR-Wx, and 7705 SAR-X, return the faulty chassis to Nokia for replacement.

When the bootstrap image is loaded, the BOF is read to obtain the location of the image and configuration files. The BOF should be located on the same compact flash drive as the boot.ldr file. If the BOF cannot be found or loaded, the system prompts the user for alternate software and configuration file locations.

The following example displays the output when the boot sequence is interrupted.

. . .

Hit a key within 3 seconds to change boot parms... 
You must supply some required Boot Options. At any prompt, you can type:
   "restart" - restart the query mode.
   "reboot"  - reboot.
   "exit"    - boot with existing values.

Press ENTER to begin, or 'flash' to enter firmware update...

Software Location
-----------------
   You must enter the URL of the TiMOS software.
   The location can be on a Compact Flash device,
   or on the network.

   Here are some examples
      cf3:/timos2.0R1
      ftp://user:passwd@192.168.xx.xxx/./timos2.0R1
      tftp://192.168.xx.xxx/./timos2.0R1

The existing Image URL is 'ftp://*.*@192.168.xx.xxx/./rel/0.0/xx'
Press ENTER to keep it.
Software Image URL: 
Using: 'ftp://*.*@192.168.xx.xxx/./rel/0.0/xx'

Configuration File Location
---------------------------
   You must enter the location of configuration
   file to be used by TiMOS. The file can be on
   a Compact Flash device, or on the network.

   Here are some examples
      cf1:/config.cfg
      ftp://user:passwd@192.168.xx.xxx/./config.cfg
      tftp://192.168.xx.xxx/./config.cfg

The existing Config URL is 'cf3:/config.cfg'
Press ENTER to keep it, or the word 'none' for no Config URL.
Config File URL: 
Using: 'cf3:/config.cfg'

Network Configuration
---------------------
   You specified a network location for either the
   software or the configuration file. You need to
   assign an IP address for this system.

   The IP address should be entered in standard
   dotted decimal form with a network length.
       example:   192.168.xx.xxx/24

Display on Non-Redundant Models


The existing IP address is 192.168.xx.xxx/20. Press ENTER to keep it.
Enter IP Address: 
Using: 192.168.xx.xxx/20

Display on Redundant Models


The existing Active IP address is 192.168.xx.xxx/20. Press ENTER to keep it.
Enter Active IP Address: 
Using: 192.168.xx.xxx/20

The existing Standby IP address is 192.168.xx.xxx/20. Press ENTER to keep it.
Enter Standby IP Address (Type 0 if none desired): 
Using: 192.168.xx.xxx/20


Would you like to add a static route? (yes/no) y           

Static Routes
-------------
   You specified network locations which require
   static routes to reach. You will be asked to
   enter static routes until all the locations become
   reachable.

   Static routes should be entered in the following format:
   prefix/mask next-hop ip-address
       example:     192.168.xx.xxx/16 next-hop 192.168.xx.xxx

Enter route: 1.x.x.0/24 next-hop 192.168.xx.xxx
OK

Would you like to add another static route? (yes/no) n

New Settings
------------
    primary-image    ftp://*.*@192.168.xx.xx/./rel/0.0/xx
    primary-config   cf3:/config.cfg
    address          192.168.xx.xx/20 active
    primary-dns      192.168.xx.xx
    dns-domain       xxx.xxx.com
    static-route     1.x.x.0/24 next-hop 192.168.xx.xxx
    autonegotiate
    duplex           full
    speed            100
    wait             3
    persist          off

Do you want to overwrite cf3:/bof.cfg with the new settings? (yes/no): y

Successfully saved the new settings in cf3:/bof.cfg

Figure: System Initialization - Part 1 displays the system initialization sequence.

Figure: System Initialization - Part 1

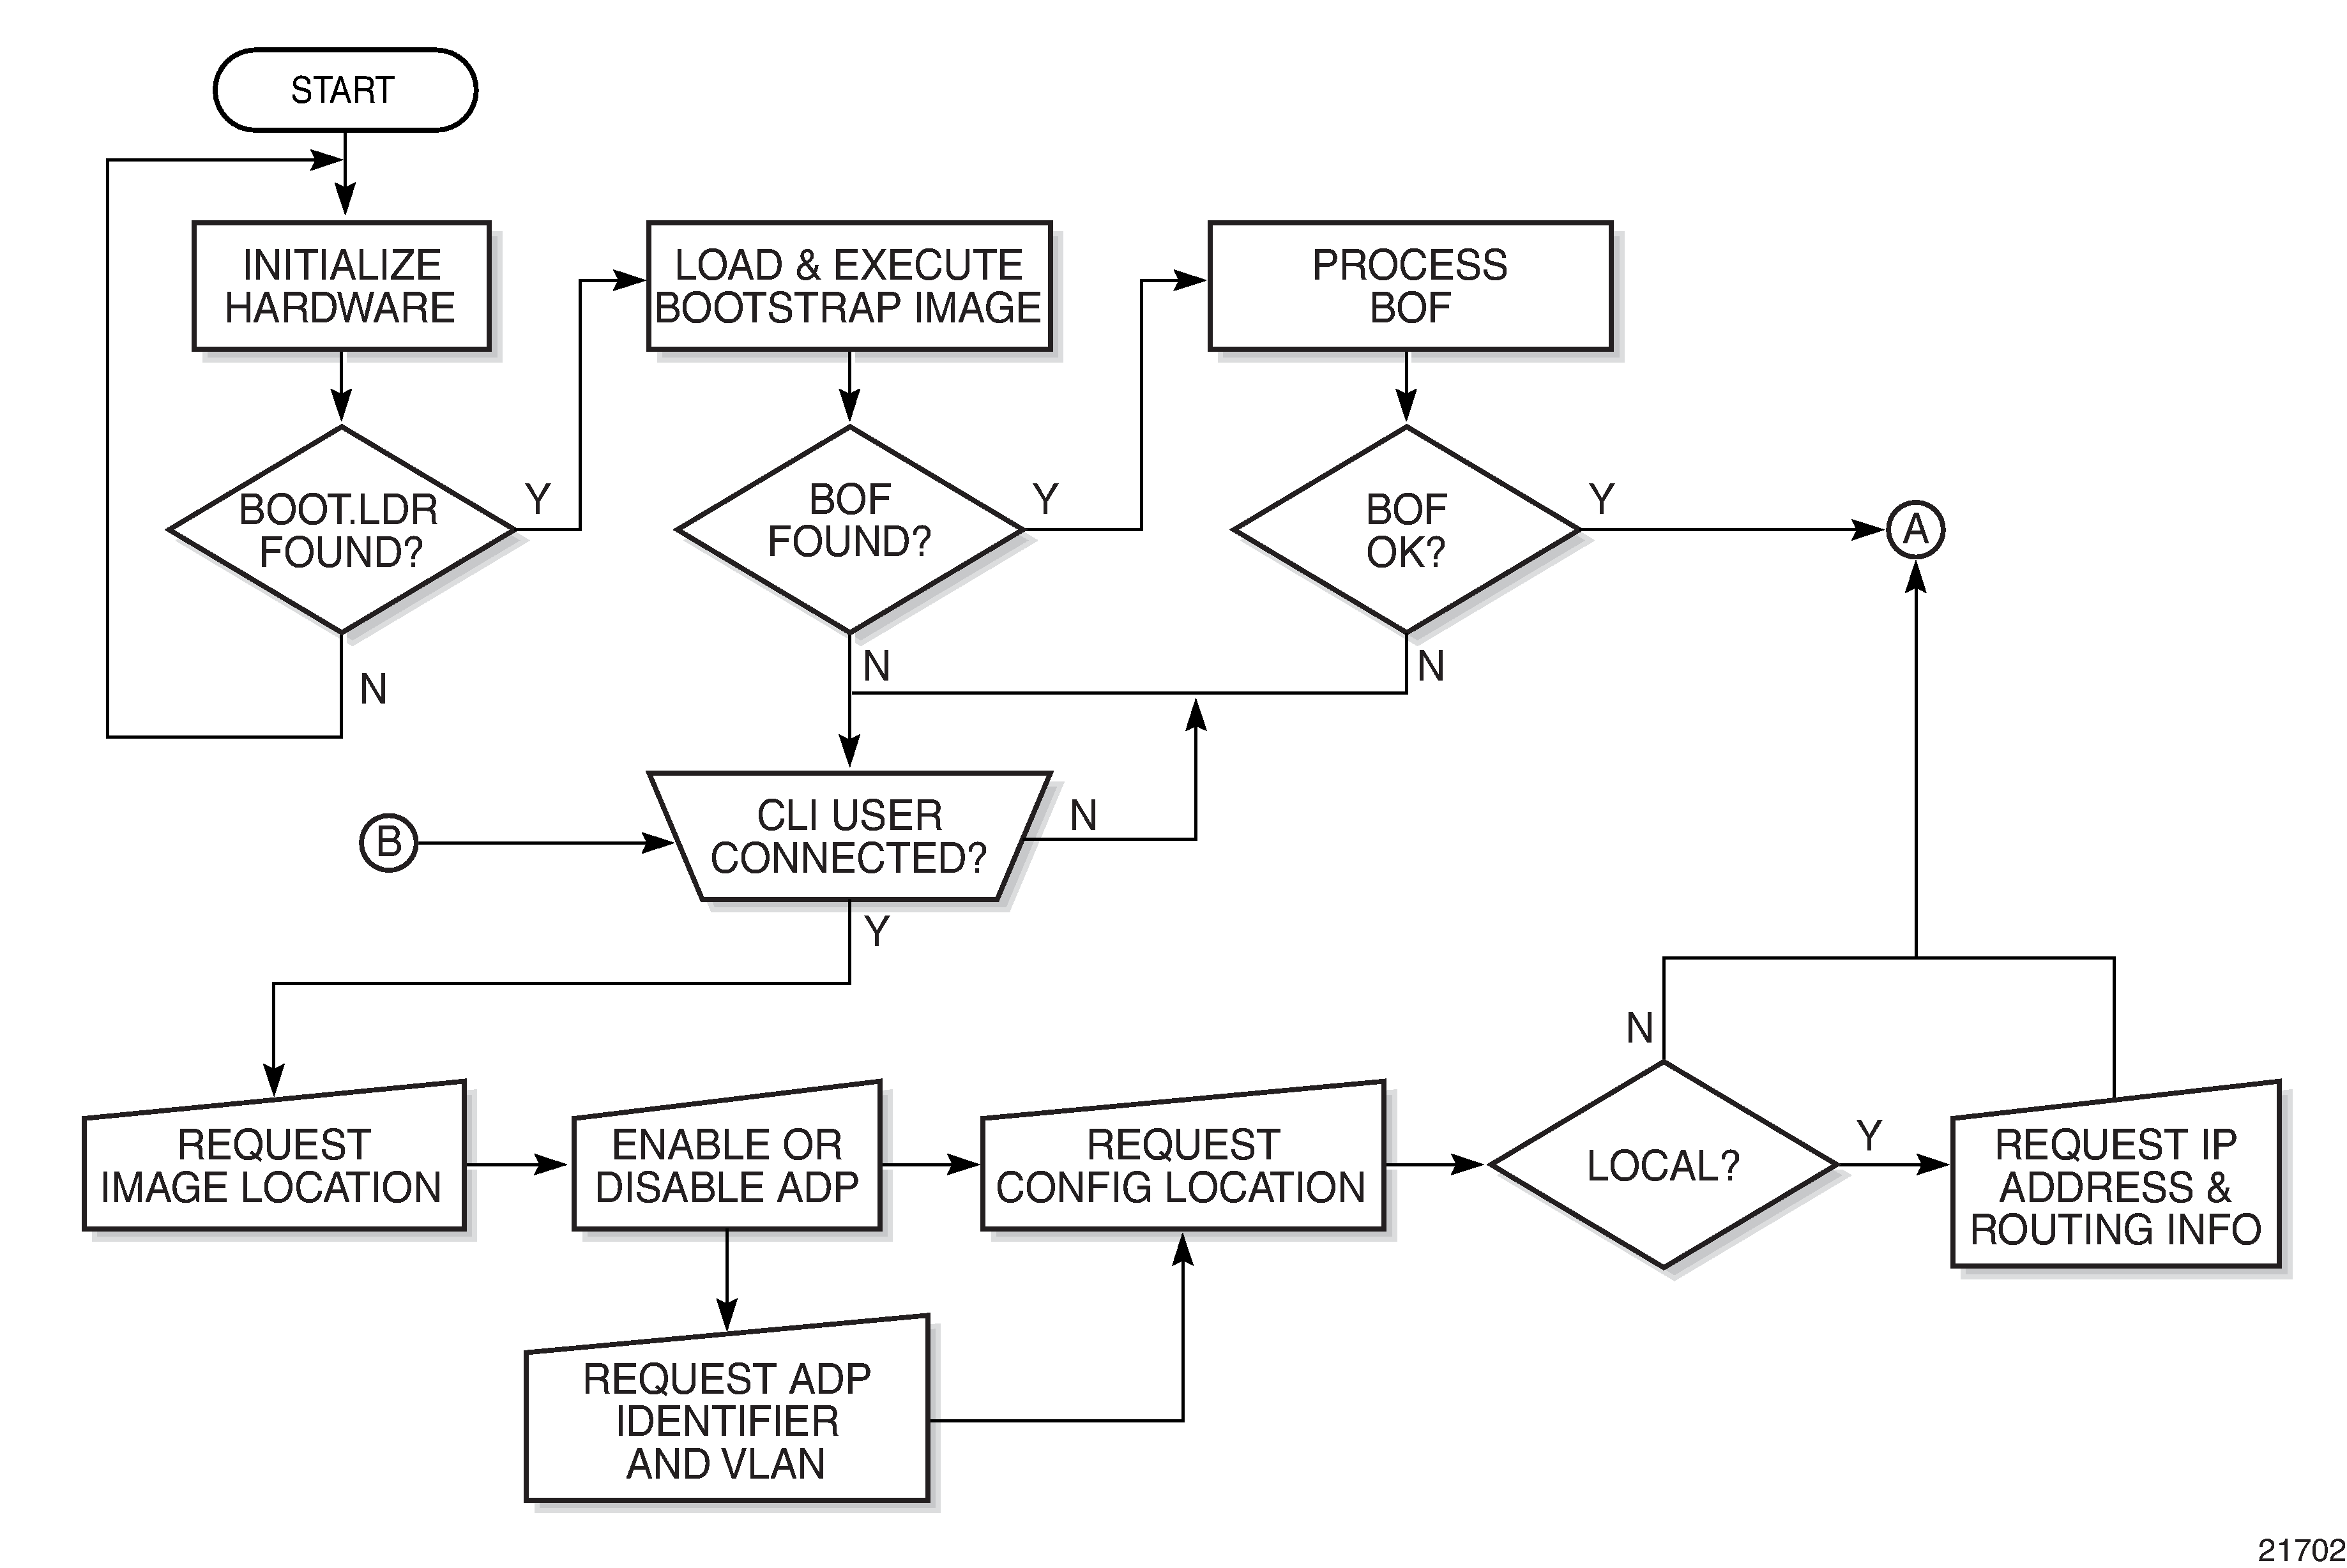
Figure: Files on the Compact Flash displays the compact flash directory structure and filenames.

Figure: Files on the Compact Flash

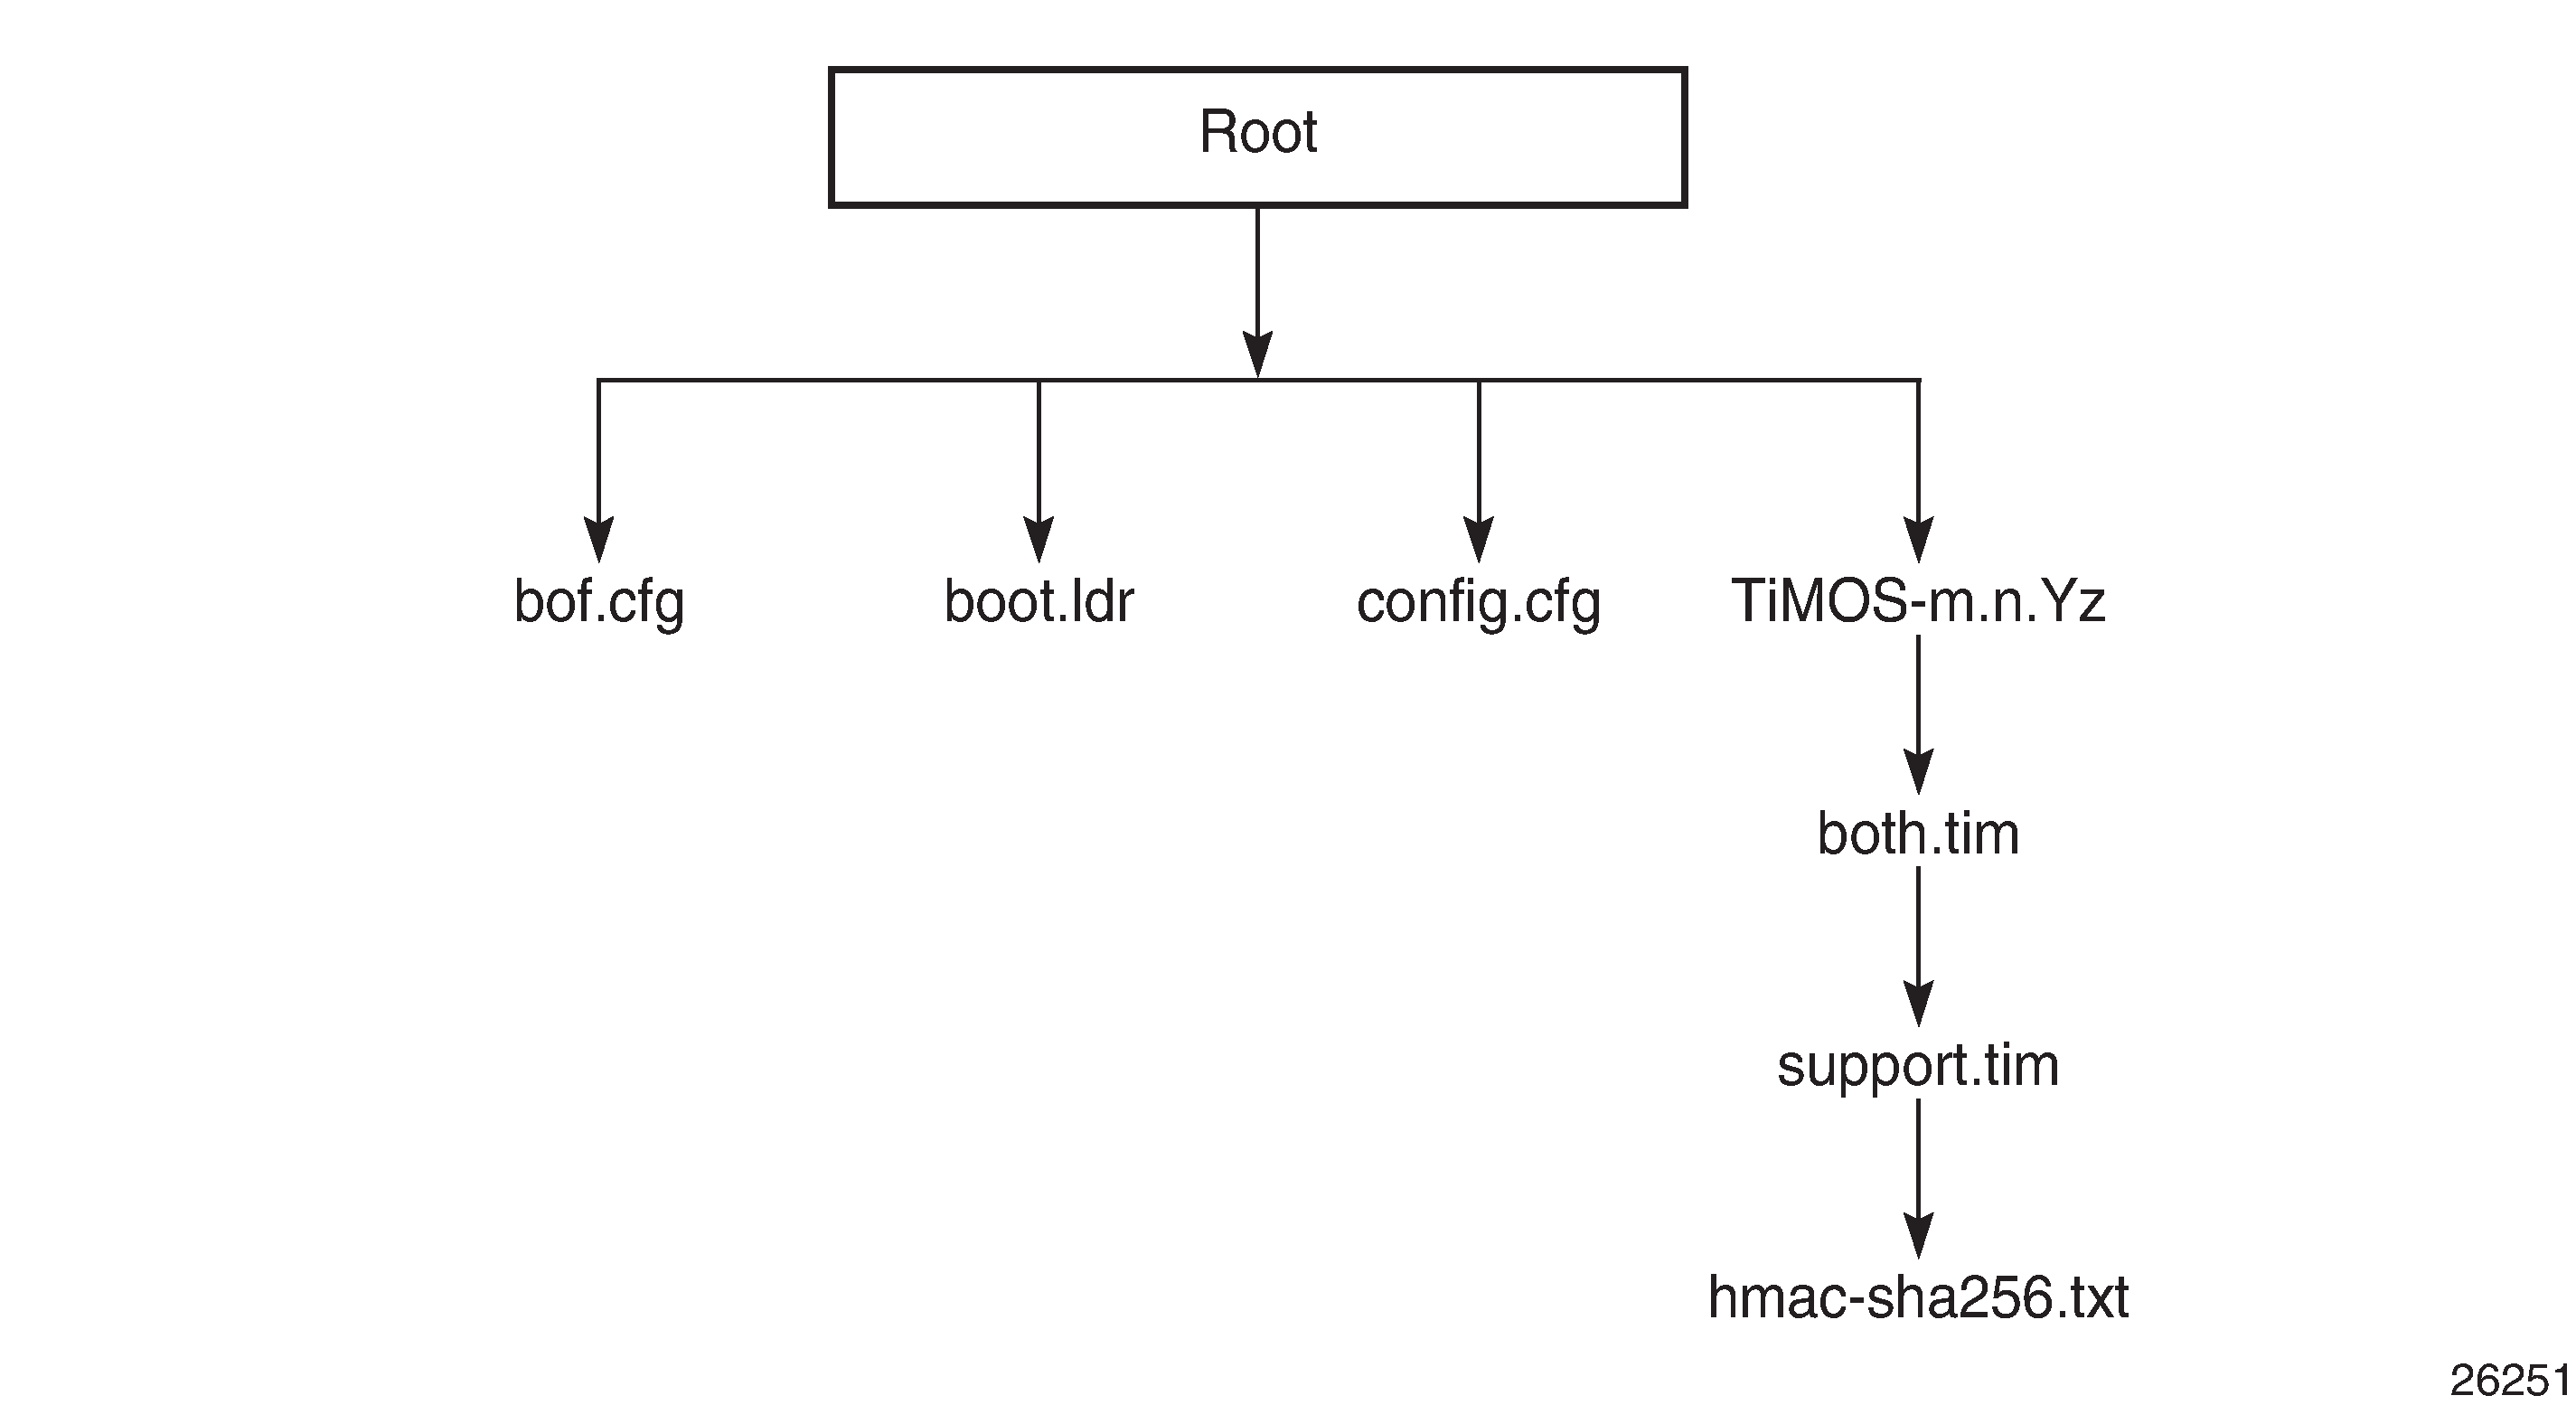
Files on the compact flash are:

Note:
  • The support.tim file is included in the software bundles for the following platforms only: 7705 SAR-8 Shelf V2, 7705 SAR-18, 7705 SAR-H, 7705 SAR-M, and 7705 SAR-X.

  • The hmac-sha256.txt file is supported in FIPS-140-2 mode only. See FIPS-140-2 Mode for more information.