6. Zero Touch Provisioning
Traditional deployment of a new node in a network is a multistep process in which the user connects to the hardware to provision global and local parameters. Zero Touch Provisioning (ZTP) automatically configures a node by obtaining the required information from the network and provisioning the node with minimal manual intervention and configuration. When new nodes that support ZTP are connected and boot up, the node is auto-provisioned.
| Note: To support ZTP, make sure the new nodes are purchased with the auto-boot flag enabled in the factory-loaded BOF. |
6.1. ZTP Overview
ZTP is used to automatically install and provision new nodes in the field. For out-of-band management, the nodes can be installed and powered up with network connectivity on the management (Mgmt) port. For in-band management, the first two connectors on the first two slots can be used for ZTP.
| Note: For breakout connectors, only the first breakout port on the first two connectors can be used for ZTP. |
After network connectivity is established, the ZTP process automatically starts. The node sends a DHCP discovery request to the DHCP server using a ZTP-capable port and the DHCP server returns an IPv4/IPv6 FTP or HTTP URL from which the provisioning information can be retrieved. The provisioning information is in a file called the provisioning file, which contains the URL of the image, config, and other files to be downloaded. After downloading these files and successfully provisioning, the node automatically reboots and comes back up in normal mode.
6.1.1. Network Requirements
ZTP requires the following network components:
- DHCP server (IPv4 or IPv6)The DHCP server supports assignment of IP addresses through DHCP requests and offers.
- file serverThe FTP or HTTP URL is used for staging and transfer of RPMs, configurations, images, and scripts.
- DHCP relayDHCP relay is required if the servers are across a Layer 3 network.
6.1.2. Network Support
ZTP operates in the following network environments:
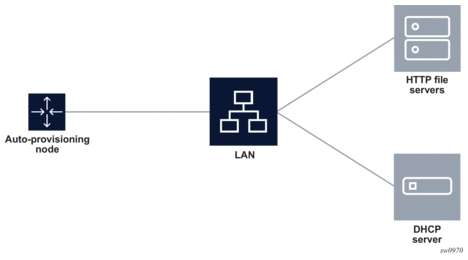
- node, file servers, and DHCP server in the same subnetFigure 9 shows the scenario where all components are in a Layer 2 broadcast domain. There is no DHCP relay and all IP addresses are assigned from a single pool.
Figure 9: Auto-provisioning with all Components in a Layer 2 Broadcast Domain
- file servers and DHCP server in the same subnet, separate from the nodeFigure 10 shows the scenario, where only the file servers and DHCP server are in the same subnet. DHCP relay is used to fill Option 82 as the gateway address. The gateway address is used to find the appropriate pool in the DHCP server to assign the correct subnet IP address to the system.
Figure 10: Auto-provisioning with all Components in a Layer 2 Broadcast Domain
 DHCP allows the Option 3 router to define the default gateway. If multiple addresses are provided using Option 3, the first address is used for the default gateway.
 - node, file servers, and DHCP server in different subnetsFigure 11 shows the scenario, where all components are in different subnets. DHCP relay adds the Option 82 gateway address to the DHCP request, and the DHCP server adds the Option 3 gateway address of the file server.
Figure 11: Auto-provisioning with all Components in Different Subnets

6.2. ZTP Processes
ZTP consists of the following processes:
- auto-boot process
- auto-provisioning process
6.2.1. Auto-boot Process
In this process, the node discovers and provisions the chassis and installed cards.
- The node is powered up.
- The out-of-band management port is checked for link connectivity. If a link is not found, the in-band management ports are checked for a link.
- The first two card or MDA slots are auto-provisioned based on the installed card types. See ZTP Overview for information about the specific card or MDA slots that are used.
- The auto-boot process switches control to the auto-provisioning process.
See Auto-boot Process for more information about the auto-boot process.
6.2.2. Auto-provisioning Process
In this process, the node detects operational ports, attempts to discover its IP address, and downloads the relevant files for provisioning.
- The node sends a DHCP discovery request to the DHCP server using the out-of-band management port. If DHCP discovery is unsuccessful, the node reattempts it using the in-band management ports.
- After DHCP discovery is successful, the DHCP server returns an IPv4 or IPv6 FTP or HTTP URL of a file server from which the node can retrieve provisioning information.
- The node downloads the provisioning information and performs the auto-provisioning according to the specifications in the files.
- After the node is successfully provisioned, it automatically reboots and becomes operationally up.
See Auto-provisioning Process for more information about the auto-provisioning process.
The SR OS can also initiate the auto-provisioning process using a tools command.
6.3. DHCP Support for ZTP
This section provides information about DHCP messages, DHCP clients, and DHCP servers that are supported by ZTP.
6.3.1. DHCP Server Offer Options 66, 67, and 43
Options 66, 67, and 43 are supported for indicating the location of the provisioning file. If both Options 66 and 67 are present in the DHCP offer, they take precedence over Option 43.
Option 66 contains the server URL or IP address, and Option 67 contains the URL of the provisioning file location.
Options 66 and 67 are meant for use by PXE TFTP, but are also used for HTTP and FTP. If an offer arrives with Options 66 and 67, Option 66 should resolve the server IP address and Option 67 should resolve the file location. Option 66 can be omitted by the provider, in which case Option 67 is used for both the server IP address and provider file URL. If an offer arrives with Option 67 only, it should resolve both the server IP address and file URL.
The auto-provisioning process distinguishes the host part of the URL and can resolve it using DHCP DNS.
6.3.1.1. Nokia-specific TLV
The Nokia-specific TLV is NOKIA-DCTOR-AUTOCONFIG. The location of the BOF for each system to use is configured in the optional autoboot file parameter, which is a standard Option 43 value initialized at the beginning of the process. The BOF location is sent in Option 43 as part of the DHCP offer and Ack messages from the DHCP server to the system. The system uses the location specified in Option 43 to initiate an FTP download of the BOF.
6.3.2. Supported DHCP Client Options for ZTP
Table 31 lists the supported DHCP client options for ZTP.
Table 31: Supported DHCP Client Options for ZTP
Options | DHCP IPv4 Option | IPv4 Comments | DHCP IPv6 Option | IPv6 Comments |
Lease time | Option 51 | Always infinite | — | — |
Requested option list | Option 55 | — | — | — |
Client ID | Option 61 | Default is chassis serial ID | Option 1 (DUID) | Type 2 — vendor-assigned unique ID (default with chassis serial ID) Type 3 — link-layer address |
User class | Option 77 | “platform;timos-release;ztp” | Option 15 | “platform;timos-release;ztp” |
Class ID | Option 60 | “NOKIA: FmtChassisType Strings” | — | — |
6.3.3. Supported DHCP Server Options for ZTP
Table 32 lists the supported DHCP server options for ZTP.
Table 32: Supported DHCP Server Options for ZTP
Options | DHCP IPv4 Option | IPv4 Comments | DHCP IPv6 Option | IPv6 Comments |
Subnet mask | Option 1 | — | — | — |
Router | Option 3 | Default gateway | — | — |
DNS server | Option 6 | DNS server | — | — |
Lease time | Option 51 | Must be infinite | — | — |
Server address | Option 54 | Identifies the DHCP server | — | — |
Classless static route | Option 121 | Used to install static routes | — | — |
NTP server | Option 42 | Future support | Option 56 | Future support |
TFTP server name | Option 66 | Server IP address | — | — |
Bootfile name | Option 67 | URL of the file Can be used without Option 66, in which case it will contain the server name and the URL | Option 59 | Server name and URL of the file |
Vendor-specific options (See Nokia-specific TLV) | Option 43 | Nokia proprietary file location Can be used instead of Options 66 or 67, but Options 66 and 67 take precedence over Option 43 | Option 17 | Nokia proprietary file location Can be used instead of Option 59, but Option 59 takes precedence over Option 17 |
6.3.4. DHCP Discovery and Solicitation
IPv4 DHCP discovery and IPv6 DHCP solicitation are supported.
IPv4 DHCP discovery messages and IPv6 DHCP solicitation messages are sent from out-of-band and in-band management ports with active links. The first valid DHCP offer for the address family that arrives on the node is used.
In the BOF, the auto-boot option can be configured to send out IPv4, IPv6, or both IPv4 and IPv6 DHCP requests.
6.3.4.1. DHCP Discovery (IPv4 and IPv6)
This section describes DHCP discovery options.
6.3.4.1.1. DHCP Discovery Options 61 and 77
The SR OS supports both Option 61 (client ID) and Option 77 (user class) DHCP discovery options.
Option 61 provides the client ID; the serial ID of the chassis is used by default. Option 61 is used for DHCP server pool selection. By default, the chassis serial ID is sent in Option 61 with a type of 0. This option is configurable using the bof auto-boot [client-identifier {string | hex | chassis-mac}] command.
Option 77 provides the user class, describing what the device is and other information, such as the OS version. This option is set automatically, but can be removed using the BOF configuration. For example, the user can omit include-user-class in the BOF auto-boot configuration, to avoid sending Option 77.
For ZTP, the DHCP discovery message should be sent with Option 77; the following information is automatically configured:
platform;timos-release;ztp
For auto-provisioning, Option 77 should use the following information:
platform;timos-release;AP
6.3.4.1.2. DHCP Discovery Option 1 DUID (IPv6)
By default, the node will use RFC 3315 DUID Type 2 vendor-assigned unique IDs. The value for enterprise-id is 6527 and the identifier is the chassis serial number.
| Note: The system uses the chassis serial number for ZTP pool selection and auto-provisioning. |
The option to use Type 3 is configured in the BOF. For MAC, the chassis MAC address is configured in a string format.
Type 1 is not supported.
6.3.4.2. DHCP Solicitation (IPv6)
Unlike IPv4 DHCP offers, which contain the prefix and default route, IPv6 DHCP offers only contain the IP address assignment. The IPv6 route advertisement (RA) provides the default router and the prefix is set to /128 for the IP address supplied by the DHCP server.
For further information about RA support, see IPv6 DHCP/RA Details. For further information about DHCP server offers, see DHCP Server Offer Options 66, 67, and 43.
6.3.5. IPv4 and IPv6 DHCP Support
The ZTP process supports the use of IPv4 and IPv6 DHCP clients to obtain the provisioning file.
For ZTP processes, the node transmits both IPv4 and IPv6 discovery and solicitation messages. If offers arrive from both IPv4 and IPv6 servers, both offers are cached and the first offer received is processed. If the first offer does not fulfill the ZTP requirements and is rejected, the second offer is processed and accepted or rejected. If both offers received on an interface are rejected, ZTP will go to the next interface.
The provisioning file only allows file transfer in the address family of the DHCP offer that is used. If the offer is IPv4, the provisioning files are downloaded using IPv4. If the offer is IPv6, the provisioning files are downloaded using IPv6.
6.3.5.1. IPv4 Route Installation Details
Option 3 (default route) and Option 121 (classless static route) are supported for IPv4 DHCP.
For identical routes with different next hops, only the first route is installed and the second route is kept as a backup route. ECMP is not supported.
There is no route limit for Option 121.
6.3.5.2. IPv6 DHCP/RA Details
IPv6 DHCP offers do not contain an IP prefix. The IPv6 prefix is usually obtained from the IPv6 RA arriving from the upstream router. For ZTP, the 7750 SR is a host; therefore, the system assigns a /128 prefix to the IPv6 address obtained from the DHCP offer.
The 7750 SR supports the use of an IPv6 RA to install IPv6 default and static routes from upstream routers. The system installs all the routes advertised using the RA. If the same route has been advertised from multiple upstream routers (next hops), the system installs the route with the highest preference. The 7750 SR does not support ECMP if the same route is advertised from multiple next hops by multiple RAs.
In accordance with RFC 4861 recommendations, the 7750 SR ensures that all RAs are obtained before the auto-provisioning process is started for IPv6. RFC 4861 recommends that the host (in this case, the 7750 SR) send a minimum of three route solicitations to increase the likelihood of at least one route solicitation being received by the upstream routers.
Each route solicitation is followed by a 4-second timeout, so the third route solicitation is sent 8 seconds after the first. The upstream routers must respond within 0.5 seconds. As a result, the 7750 SR receives all RAs and routes within 8.5 seconds of the first route solicitation, and will wait a maximum of 9 seconds to receive all RAs; ZTP always waits 20 seconds to receive all RAs, however, only the first RA received will be used.
6.3.5.3. ZTP and DHCP Timeouts
The ZTP timeout interval is 30 minutes. After each ZTP timeout, the node reboots and reattempts the ZTP process. The node does not reboot if the ZTP timeout interval expires while the node is executing a DHCP offer or downloading files. The node executes the DHCP offer until it succeeds or fails, at which point the node reboots; if the offer is successful, the node comes up in normal operation mode.
The DHCP timeout interval is 20 seconds. If a DHCP offer is not received within the DHCP timeout interval, the auto-provisioning process is reattempted using the next valid interface.
6.4. ZTP Procedure Details
This section describes ZTP procedures including node bootup, BOF, auto-provisioning, logs, and events.
6.4.1. Node Bootup
After the node is powered up, the BOF is examined for the auto-boot flag status. If the auto-boot flag is set in the bof.cfg file, the node goes into ZTP mode. If the auto-boot flag is not set in the bof.cfg file, the node continues booting normally.
If it is in ZTP mode, the node provisions all hardware necessary for the ZTP process. This includes the fabric, the first two card slots, and the MDAs for the first two card slots. The node then checks for links on the management (Mgmt) port and valid Ethernet ports.
| Note: A bof.cfg file with the auto-boot flag enabled can be shipped as an orderable part with the applicable software license. The auto-boot flag can also be set using the bof>auto-boot command. |
For more information about the BOF, see BOF.
6.4.1.1. Reinitiating ZTP During Normal Node Bootup
ZTP can be reinitiated any time by setting the auto-boot flag and configuring the flag options in the BOF. After the auto-boot flag is set, any reboot forces the node into ZTP mode, including DHCP discovery, and downloading and reprocessing the provisioning file. The old BOF is kept in the storage medium until the ZTP process is successful, then the old BOF information is overwritten. If an unsuccessful ZTP process is interrupted and the auto-boot flag is removed, the node boots using the old BOF.
6.4.2. BOF
Two versions of each supported 7750 SR platform software license are currently available: one for non-ZTP bootup, and one for ZTP bootup. Software packages for ZTP bootup contain a bof.cfg file with the auto-boot flag set, which causes the node to automatically boot up in ZTP mode and execute ZTP processes.
The auto-boot flag contains the following information:
- client IDThe client ID is sent to the DHCP server to identify the chassis or node and to find a pool for the DHCP offer. If no client ID is configured, the chassis serial number is sent.This option is used for both IPv4 client ID and IPv6 DUID Type 2.
- port (port:vlan)The port is used to send DHCP discovery; the port number must be configured manually in the BOF.For more information about the BOF, see Boot Options.
6.4.2.1. SD Card and Compact Flash Support
Nokia recommends that the provisioning file be downloaded to an SD card, and the BOF should point to the SD card for imaging and configuration.
The BOF does not support loading from the network using HTTP or HTTPS.
6.4.3. Auto-boot Process
This section describes the ZTP auto-boot process.
6.4.3.1. Options and Option Modification
By default, the auto-boot process scans all ZTP-enabled ports to find a port with an operational link. The scanned ports include:
- out-of-band management port (Mgmt port)
- Ethernet ports on the first two card or MDA slots (used for in-band management)

Note: For breakout connectors, only the first breakout port in the connector can be used for ZTP.
ZTP will attempt to discover the node IP via DHCP and will identify the node using DHCP client ID Option 61 (IPv4) or Option 1 (IPv6). The client ID uses the chassis serial number by default. The chassis serial number is visible on the shipping box of the chassis.
Table 31 lists the default DHCP client options for ZTP. Some client options can be manually configured in the BOF using the bof>auto-boot command.
The optional auto-boot command parameters are as follows:
- [management-port]This keyword specifies that ZTP should only be performed using the out-of-band management port (Mgmt port).
- [in-band [vlan vlan-id]]This keyword specifies that ZTP should only be performed using Ethernet ports on the first two card or MDA slots. The vlan-id parameter can be used to specify an in-band VLAN to use for the auto-boot process.
- [ipv4] [ipv6]These keywords specify that IPv4 discovery, IPv6 discovery, or both, should be performed. If both keywords are specified, the system will dual-stack.
- [client-identifier {string ascii-string | hex hex-string | chassis-mac}]These parameters identify the node to the DHCP server and find a pool for DHCP offers. This information is sent using Option 61 (IPv4) or Option 1 (IPv6). If the parameters are not configured, the chassis serial number is sent by default. This option is used for both IPv4 client ID and IPv6 DUID Type 2.
- [include-user-class]This keyword specifies that Option 77 should be included.
The auto-boot options can be modified using the bof>auto-boot command, or by interrupting the bootup process and manually modifying the bof.cfg file.
| Caution: Manually modifying the bof.cfg file is not recommended. When modifying auto-boot options using CLI, all required options must be explicitly configured because the default cases will no longer be used. When modifying the bof.cfg file manually, the format must be correct. |
6.4.3.2. CLI Access
The auto-boot process is executed in the background and does not block CLI usage. The user can enter CLI commands while the auto-boot process is running in the background. A warning message is displayed to notify the user that the auto-boot process is being executed. Any configurations performed using the CLI may be lost when the node reboots following successful auto-boot and auto-provisioning processes. After the node has finished booting and if the auto-boot flag is set in the BOF, the node displays the login prompt.
The user can access the CLI using a console and can change and save the BOF configuration; the user can remove or modify the auto-boot parameter in the BOF.
6.4.3.3. Interrupting Auto-boot
The auto-boot process can be interrupted using the tools>auto-boot terminate command. After the auto-boot process is terminated, use the bof>auto-boot command to modify the auto-boot flag.
| Note: The auto-boot flag can also be modified without interrupting the auto-boot process. |
6.4.4. Auto-provisioning Process
This section describes the ZTP auto-provisioning process.
See Provisioning Files for information about files that are downloaded during the auto-provisioning process.
6.4.4.1. Auto-provisioning Procedure
After the node enters ZTP mode, the auto-discovery process is executed to provision the necessary hardware for node discovery.
The following are the operational steps of the auto-discovery process.
- DHCP is used to discover the IP address of the node.
- Options 66 and 67, or Option 43 is used to find and download the provisioning file.The provisioning file includes the location of necessary files, such as configuration information, system image, and licenses, along with the DNS needed to resolve these location URLs. The file also includes BOF information required to boot the node into operational mode.
- The provisioning file is executed to download the named files to the node.
- After all files are successfully downloaded, the node is rebooted and the auto-boot flag is cleared from the BOF.
After the node reboots, it comes up in normal operational mode.
The node can be put back into ZTP mode by editing the BOF to include the auto-boot flag and saving the BOF. Doing so causes the node to enter ZTP mode after it is rebooted.
Use one of the following methods to run the auto-provisioning process.
- automatic executionThe auto-boot process will automatically execute the auto-provisioning process if the auto-boot flag is set in the BOF.
- manual executionThe auto-provisioning process can be executed manually using the tools>perform>system>auto-node-provisioning command.If the auto-provisioning process is executed manually, only interfaces without IP addresses are considered part of the discovery mechanism. Additionally, while the process is running, it will attempt to discover DHCP servers using all card or MDA slots and ports with Layer 3 interfaces that do not have IP addresses.
Note: Using the tools>perform>system>auto-node-provisioning command while the auto-boot process is running is not allowed.
6.4.4.2. Out-of-band Management Versus In-band Management
The auto-provisioning process can use the out-of-band management port (Mgmt port) or in-band management on Ethernet ports.
The node attempts the auto-provisioning process using any port with an operational link, starting with the out-of-band management port. If the node cannot be discovered using the out-of-band management port, either because the port is down or is not receiving a DHCP offer from the DHCP server, the process is reattempted using the Ethernet ports. If the Ethernet ports fail, the management port is tried again and the cycle repeats sequentially.
The following operational guidelines apply to in-band and out-of-band management ports.
- Out-of-band management and in-band management support untagged frames.
- Out-of-band management does not support dot1q (VLAN tags).
- In-band management supports dot1q interfaces if the VLAN is correctly configured in the BOF.
- VLAN discovery is not supported.
If out-of-band management is used, no card or MDA provisioning is necessary and the auto-provisioning process executes as soon as an active link is detected on the Mgmt port.
To use out-of-band management exclusively, use the bof>auto-boot management-port command.
To use in-band management exclusively, use the bof>auto-boot inband [vlan vlan-id] command.
6.4.4.2.1. Supported In-band Management Ports
See ZTP Overview for information about which ports support in-band management for ZTP.
6.4.5. Provisioning Files
Provisioning files are created by the operator, based on requirements and the locations of the necessary files. A provisioning file contains the locations and URLs of critical files, such as the system image, configuration information, and necessary licenses, and can also contain DNS server information used to resolve these locations.
A provisioning file consists of two main parts:
- location of file typesContains locations of the following file types:
- system image
- configuration information
- licenses
These items can be downloaded using FTP or HTTP; DNS server information can also be included. - BOF informationBOF information can be loaded on the node after the ZTP processes are completed; the BOF portion of the file must be formatted correctly.

Caution: Ensure that the auto-boot flag is not set on the BOF that will be downloaded by the auto-provisioning process. Failure to do so will cause the node to go back into ZTP mode after it reboots.
The provisioning file is stored on the SD card and can be executed using the tools>perform>system>auto-node-provisioning>file command to re-download the named files.
6.4.5.1. Provisioning File Download
The provisioning file location is discovered using DHCP offer Options 66, 67, or 43, and is downloaded using HTTP only.
The provisioning file URL can be resolved using DNS, in which case up to three DNS server IP addresses should be present in the DHCP offer using Option 6 (IPv4). The DHCP DNS is only used for resolving the provisioning file URL, and not for resolving the URLs of the files named within the provisioning file.
ZTP does not support Option 15 domain names; the URL of the provisioning file should be in “host/domain” format, or a simple IP address should be used.
6.4.5.2. Provisioning File Resolution Using DNS
If the downloaded provisioning file includes a DNS IP in the DNS section of the file, the URLs of the files in the provisioning file must be resolved using this DNS server or by the DNS server listed in the DHCP offer.
Up to three DNS addresses (primary, secondary, tertiary) can be listed in the DNS section of the provisioning file. If all three DNS addresses are listed, they are attempted in the order they are listed, to resolve the file URLs.
6.4.5.3. File Download and Redundancy
Up to three locations can be set for each file type, using the primary-url, secondary-url, and tertiary-url fields. The auto-provisioning process attempts to download all files using the primary-url information for each file. If this attempt is unsuccessful, the process will reattempt using the secondary-url information for each file. If this attempt is not successful, the process will reattempt, using the tertiary-url information.
A ZTP operation is considered successful when all files named in the provisioning file are downloaded. If all file locations are attempted and all named files are not successfully downloaded, the auto-provisioning process fails and ZTP will reattempt the provisioning process using the next valid interface.
6.4.5.4. Sample Provisioning File
The following output is an example of provisioning file information.
6.4.5.5. Proxy Support
HTTP can connect to public servers using a proxy. The proxy is in URL format and the URL must be resolved using the provisioning file DNS.
The proxy can include a username and password. Proxy PAC is not supported.
Proxy information formatting is as follows:
http://user@hostname:file-path
proxy http://ip-or-url user@hostname:port
6.4.6. Logs and Events
ZTP displays detailed events about all stages of the auto-boot and auto-provisioning processes. All events are saved in a log file on the SD card at the end of the ZTP process.